


Trigger History
Introduction
Feature Overview
Trigger History records the details of Automations Pro executions, providing an overview of the performance and helping users precisely track the execution details of each node.
Scenarios
Scenario Name | Problem Statement | Solution on Jodoo |
Tracking and Debugging | How to discover flaws of current workflows and optimize them? | Trigger History allows precise tracking of workflow execution paths, providing insights for workflow optimization. |
Error Feedback and Handling | How to find the problems in the workflows and handle them quickly? | In case of errors, exceptions, or interruptions in workflow execution, Trigger History helps quickly locate the problematic node, allowing for manual retries. |
Log Analysis | How to identify potential problems in workflows and prevent them? | In Trigger History, the execution of different workflows is deeply analyzed, so that potential issues can be identified and promptly addressed with appropriate optimization measures. |
Security Auditing | How to ensure compliance requirements are met? | Trigger History is reliable and traceable, recording critical information such as the initiator, time, and actions, thus meeting compliance requirements. |
Where is Trigger History?
There are two entries:
1. Edit > Extension > Automations > Trigger History.
Here, you can view the automations of a form.

2. App Management > Automations > Automations Pro cards > Trigger History.
On this page, you can view all the automations in the app.

How to View Trigger History?
Trigger History data can be queried based on the following filters:
- Trigger Time: A time range, in the YYYY-MM-DD HH:MM:SS format.
- Run Result: In progress/Successful/Failed.
- Triggered by: Select All/Anonymous User/Member Name
Without set filters, the complete Trigger History of the automation will be displayed; by clicking Filter, you can add one or more filters.

What does Trigger History include?
Trigger Time
The time when the Automations Pro was triggered.
Triggered by
Triggered by shows nicknames of users who triggered the automation.
- Scheduled Trigger Pro is triggered by System Robot;
- For trigger events occurring via a public link, the triggering users will be categorized as Anonymous User. If you want to view the related logs, you can set the filter: Triggered by Anonymous User to query them. The user names will shown empty in the table.

Trigger
In the Trigger column, the displayed contents vary based on the trigger type and the trigger event.

Trigger Type | Trigger Event | Displayed Contents |
Add Record Update Record Delete Record Workflow Ends | the trigger event, the triggering form name, and the triggering records' title | |
Workflow flows to next node | the trigger event, the triggering form name, the triggering records' title, and the node name | |
Custom Start Time | One-Time Trigger/Recurring Trigger | |
Trigger by Date&Time field | One-Time Trigger/Recurring Trigger, the triggering form name, and the triggering records' title | |
Triggered by HTTP | Triggered by HTTP | |
Click the button | The button name, the triggering form name, and the triggering records' title |
Members with the permission to view the triggering form can click the record title to view the record.

Result
In the Result column,
1. When the automation is in progress/successfully ran, you will see the run results of the following nodes (5 nodes at most):
- Add/Update/Delete Record nodes: the action, the triggered form name, number of successful executions.
- Add Plugin nodes: the action, the plugin name.
- Add Formula nodes: the action, the calculation result.
2. When the automation failed, you will see the reason for the failure.

Details
1. Viewing the details of all nodes
In the Result column, you can click View Details to enter the workflow page, which shows:
- The run results: Success, Failed, In Progress.
- Version details: Version number, and the status (Previous/Latest), over which you can hover your cursor to view the version's release time and publisher.
- How all the nodes performed are presented in a workflow canvas. The nodes will offer previews of their execution, and be differentiated using four colors:
- Green nodes: Successfully-running nodes, displaying execution results.
- Red nodes: Failed nodes, displaying the failure reasons.
- Blue nodes: Nodes in progress.
- Gray nodes: Nodes not executed.

If you need to view the version's detailed configuration and properties, click the version number, and you will see the complete design, which is viewable but unadjustable.
Note:
Trigger History records the version details at the time of execution, which may not be of the latest version.
2. Viewing the details of one node
Select an node to view detailed history of this node. Depending on the run result, different details can be viewed, including:
- Green (Success): Configuration, Time, Run Result;
- Red (Failed): Configuration, the Retry option, Time, Cause of Failure, and Suggestions;
- Gray (Not Executed): No Trigger History.

If you need to view the node's detailed configuration, click View Configuration, and you will see the details, which are viewable but unadjustable.
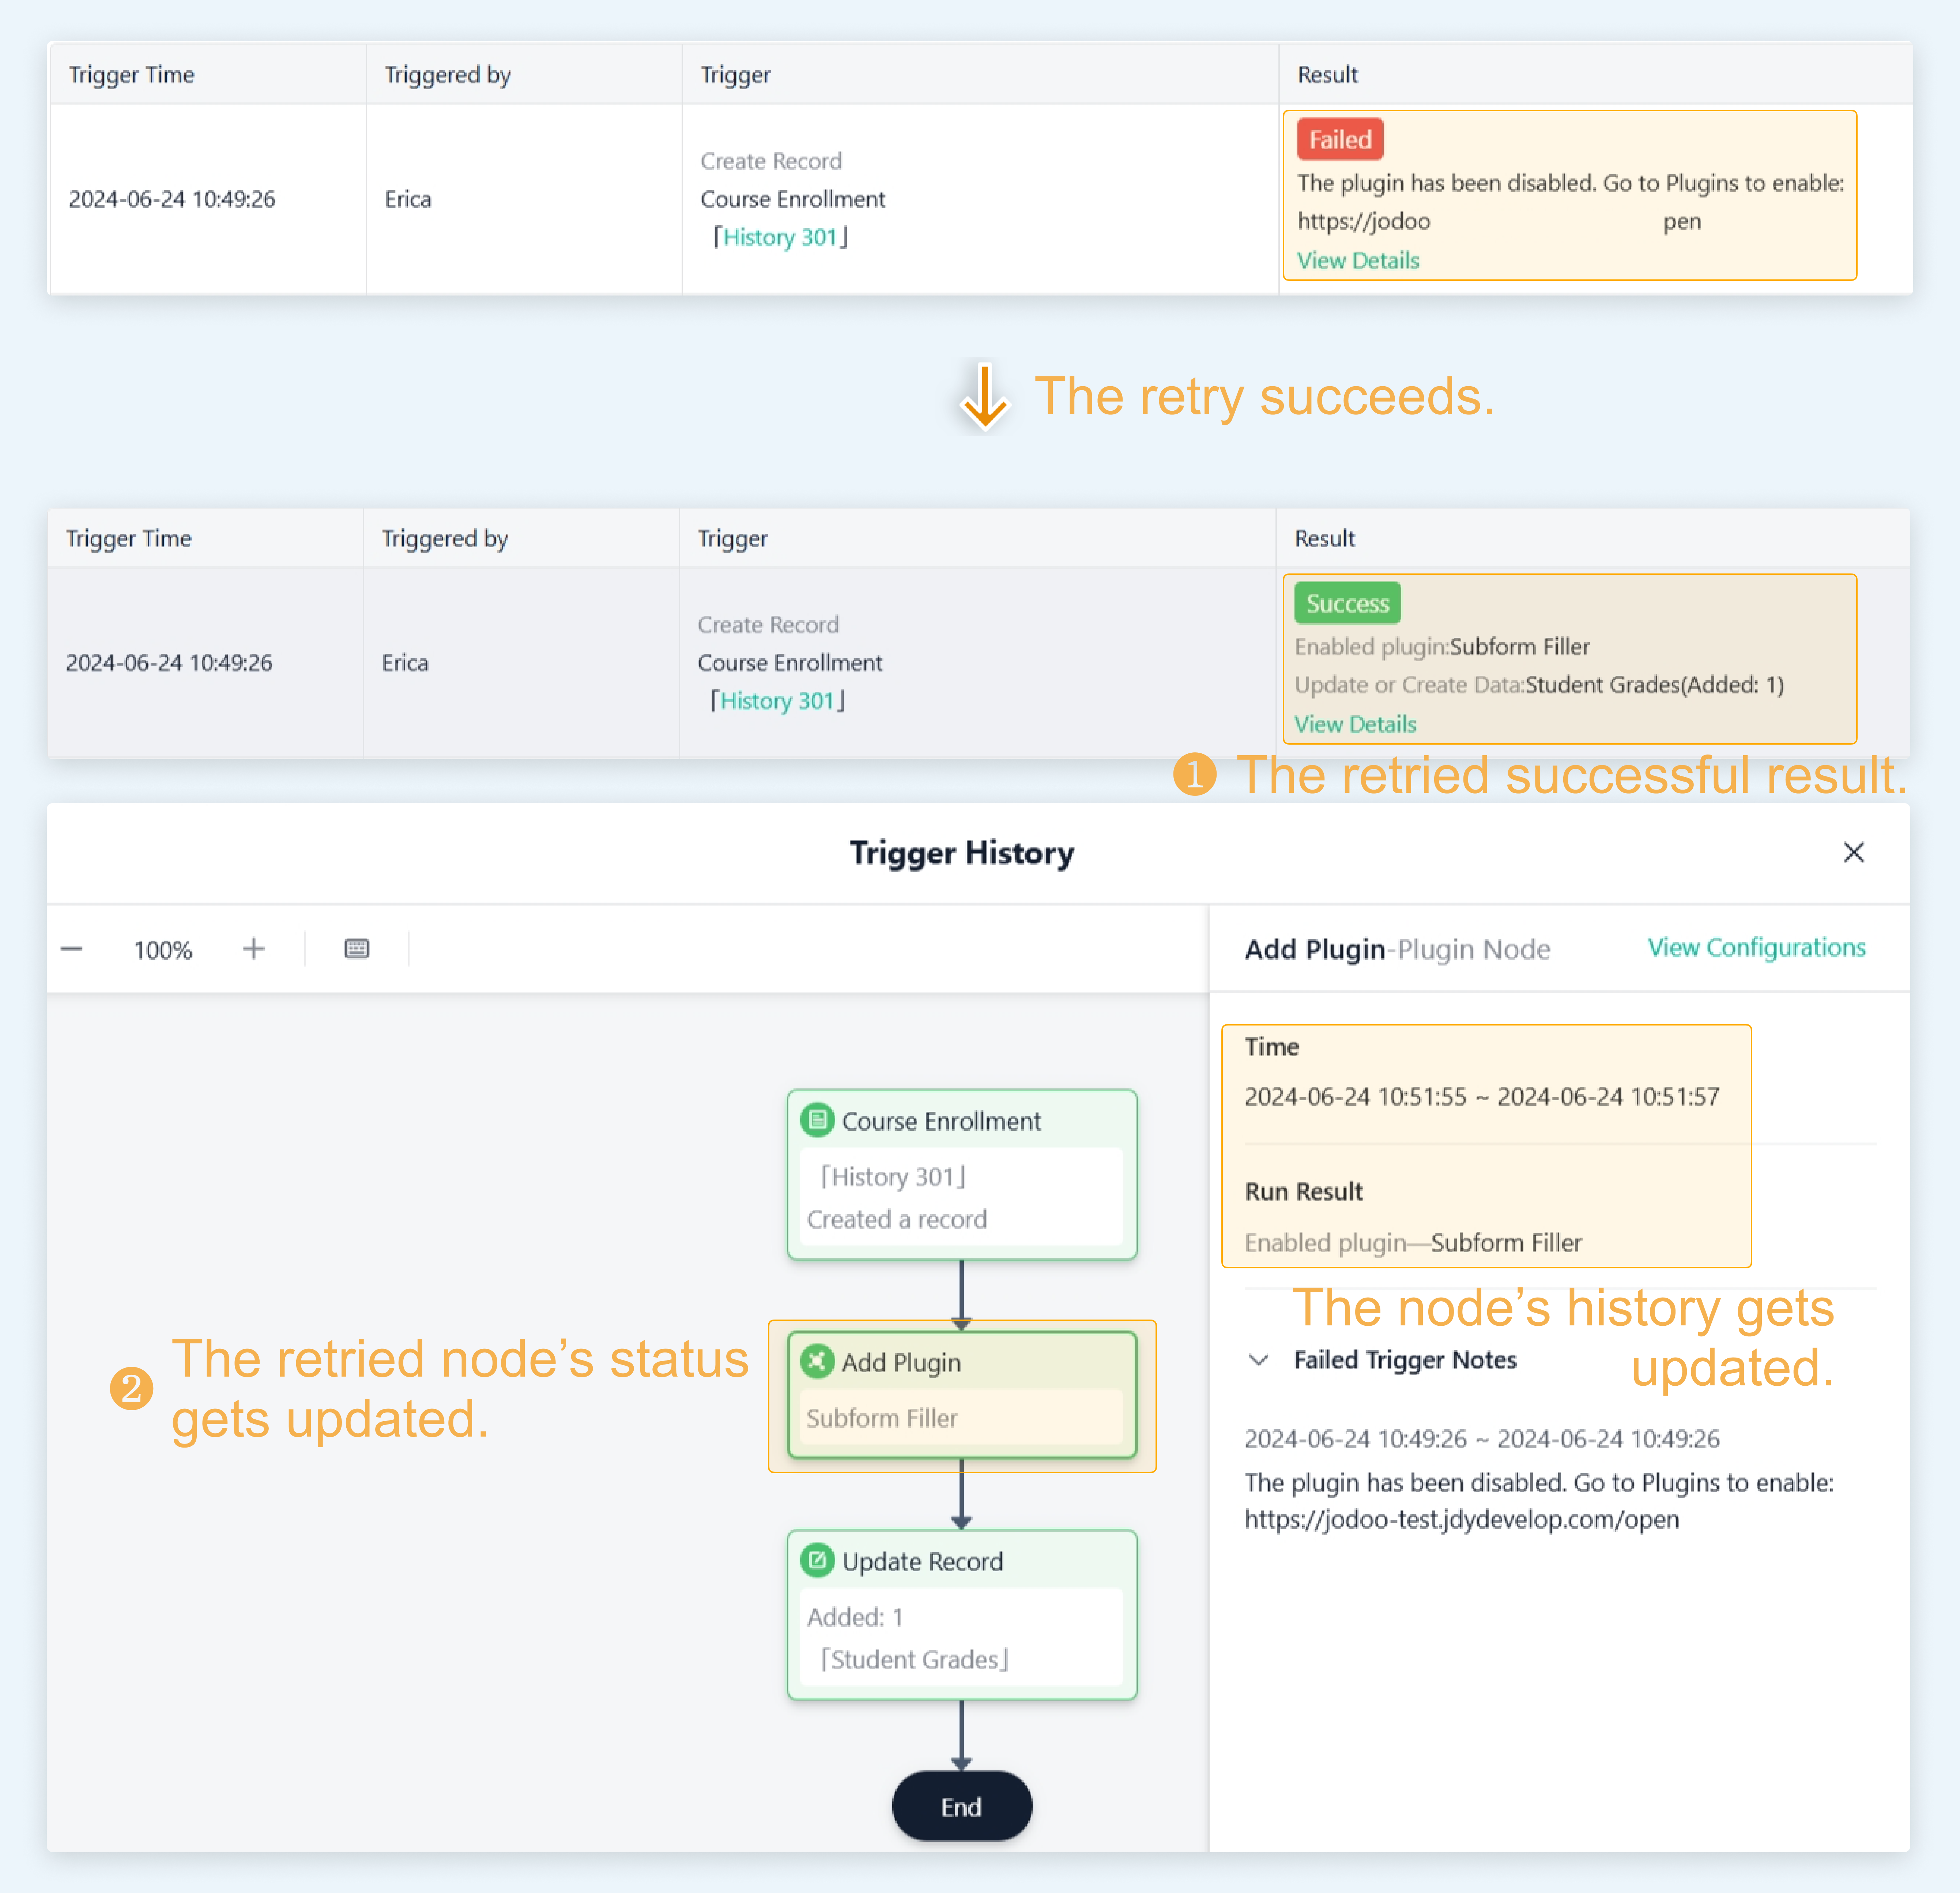
3. Retry
Depending on the type of failure, different measures are taken:
- If the failure is not due to configuration flaws, you can click Retry.

- If the retry fails, the run details will update, and there will a record added to the failure logs that tells the time and cause of the new failure.

- If the retry succeeds, the run result in the Trigger History table will be updated, so will be the run logs.
- If adjustments to the configuration are necessary, you should adjust the design and publish the optimized version.
Note:
1. If you modify data beside Trigger Data, subsequent nodes will execute on the lastest data during retries.
2. Even if the automation is redesigned, the retry will still be done in the corresponding(previous) version recorded in Trigger History.
Failed Automation Notification
Where to Set
Go to Messages > Settings > System Logs > Failed Automation:

Methods
The notifications can be sent via System Messages or Email.
Method | Where to receive? | Checked by Default? | Recipient(s) |
System Messages | In Jodoo: Messages > System Logs | Yes | Owner; Super Admin |
No | Owner; Other recipients can be added. |
Setting Recipient(s)
You can set recipients other than Owner when the notifications are set to send via emails.
Click Set Recipients, and check the users you want to notify; you can also Add Recipient onto the list. After the settings, click OK.

Note: You can add another 5 recipients at most.
Notes
1. Free-plan accounts do not support data recycling; they do not store deleted records. Therefore, when Delete Record is set as the trigger event, the failed executions cannot be retried if the owner account is free-plan.
2. If the failure occurs because the current form is performing other batch actions, the system will attempt to retry automatically up to 5 times. After these retries, the final execution result will be recorded in the Trigger History (During retry, the status of Automations Pro will be shown as Retrying...).