


Updating or Adding Data
Introduction
Functions
The Update or Add Data function in Automations allows for updating existing records or adding new ones. When a record in the triggering form meets the specified filter conditions, the system will update the corresponding record in the database. If no records match the filter conditions, the system will automatically add a record.
Demonstration
In the scenario of student course registration, Automations can be set based on the following logic: When the student answers Yes to the question of whether they have registered online, the system will automatically sync the student's information to the form Student List. If the student's information is not found in the form Student List, the system will automatically create a record.

Setting Procedure
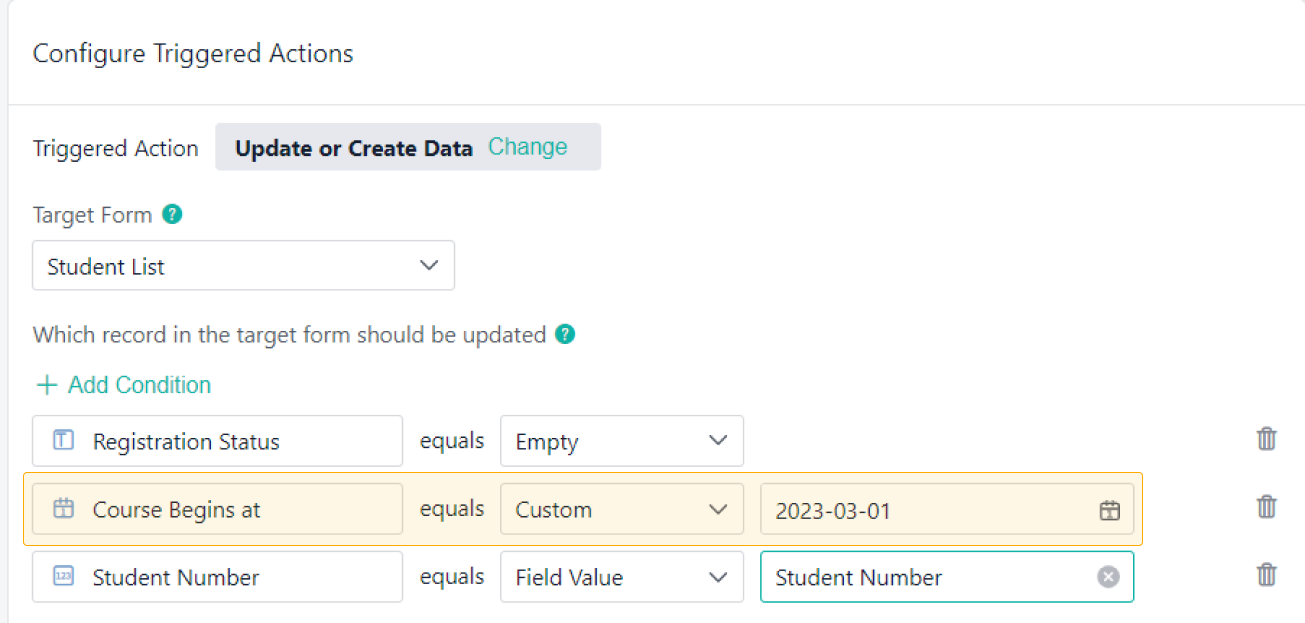
After setting the trigger, you will see the part Configure Triggered Actions. In this example, the condition of the trigger is set to Registered Online or not equals Yes.

Configuring Triggered Actions
Click Update or Create Data in Data Processing.

Setting the Target Form
When selecting the target form for the triggered action, choose the form where you wish to update or add records.

Note:
The target form can be from the current app or from another app. Only one target form can be chosen for each triggered action.
Adding Conditions
The filter condition is used to set different field values so as to filter out the specific records you need to update. Only the records filtered out will be updated.

Note:
The following field types cannot be set as filter conditions in the target form: Divider, Image, Attachment, Query Data, Select Data, Signature, Current Node, and Approver.
The field value can be set to the following three types: Field Value, Custom, and Empty.
Field Value
1. Set fields in the target form as fields in the triggering form. This will trigger the automatic match of field value in the target form to the field value in the triggering form.

2. For different fields in the target form, the corresponding fields in the triggering form can be set as follows:
Target Form Type | Triggering Form Type |
Single Line | Single Line, Single Select, Radio, Serial NO., or SubForm (Single Line, Single Select, Radio) |
Multi Line | Multi Line or SubForm (Multi Line) |
Number | Number or SubForm (Number) |
Single Select | Single Line, Single Select, Radio, Serial NO., or SubForm(Single Line, Single Select, Radio) |
Radio | Single Line, Single Select, Radio, Serial NO., or SubForm(Single Line, Single Select, Radio) |
Checkbox | Checkbox, Multi Select, or SubForm (Checkbox, Multi Select) |
Multi Select | Checkbox, Multi Select, or SubForm (Checkbox, Multi Select) |
Data&Time, Created Time, or Updated Time | Data&Time, SubFom(Data&Time), Created Time, or Updated Time |
Serial No. | Single Line, Single Select, Radio, Serial NO., or SubForm(Single Line, Single Select, Radio) |
SubForm field | Form field or SubForm fields |
Member | Member, SubForm(Member), or Creator |
Members | Members or SubForm(Members) |
Department | Department or SubForm(Department) |
Departments | Departments or SubForm(Departments) |
Workflow Status | Workflow Status |
3. When the Date&Time field is set as the filter condition, the filter rules are as follows:
Target Form Field/Triggering Form Field | YYYY-MM | YYYY-MM-DD | YYYY-MM-DD HH:MM | YYYY-MM-DD HH:MM:SS |
YYYY-MM | Same | Same in YYYY-MM | Same in YYYY-MM | Same in YYYY-MM |
YYYY-MM-DD | Same in YYYY-MM | Same | Same in YYYY-MM-DD | Same in YYYY-MM-DD |
YYYY-MM-DD HH:MM | Same in YYYY-MM | Same in YYYY-MM-DD | Same | Same in YYYY-MM-DD HH:MM |
YYYY-MM-DD HH:MM:SS | Same in YYYY-MM | SSame in YYYY-MM-DD | Same in YYYY-MM-DD HH:MM | Same |
Custom
1. You can set the field value of the target form as Custom to customize the field value.
2. When the field value of the target form is set to Custom, you can customize the field value for different field types in the following ways:
Field in the Target Form | How to Customize |
Single Line, Multi Line, Radio, Single Select, or Serial NO. | Enter text directly. |
Checkbox, Multi Select | Multiple texts can be entered and you can separate them using the Enter key. |
Number | Enter a number directly. If you enter a non-numeric content, it will be regarded as a null value. |
Date&Time | Select the date or time directly. |
Member or Members | Click to select members. |
Department or Departments | Click to select departments. |
Empty
You can set the field value of the target form to Empty as well.

Note:
Each field can only be set as a filter condition once. The maximum number of records that meet the filter condition is 200. If the limit is exceeded, the triggered action will be stopped.
Adding Fields to be Updated
Fields to be updated refers to the fields in the target form that will be updated when the filter conditions are met.

The field value can be set to the following three types: Field Value, Custom, and Empty.
Field Value
1. Set fields in the target form as fields in the triggering form. This will trigger the automatic match of field value in the target form to the field value in the triggering form.

2. For different fields in the target form, the corresponding fields in the triggering form can be set as follows:
Field in the Target Form | Field in the Triggered Form |
Single Line | Single Line, Single Select, Radio, Serial NO., or URL Parameter |
Multi Line | Multi Line |
Number | Number |
Single Select | Single Line, Single Select, Radio, or URL Parameter |
Radio | Single Line, Single Select, Radio, or URL Parameter |
Checkbox | Checkbox or Multi Select |
Multi Select | Checkbox or Multi Select |
Data&Time, Created Time, or Updated Time | Data&Time, Created Time, or Updated Time |
SubForm field | Form field |
Image | Image |
Attachment | Attachment |
Member | Member or Creator |
Members | Members |
Department | Department |
Departments | Departments |
Note:
If you need to update the subform field in the target form, you must add the subform field in the filter condition.
3. When there are differences between the settings of the target form field and the triggering form field, it will be treated as a special case and handled based on the following rules.
Field in the Target Form | Field in the Triggering Form | Rules |
Only one image can be uploaded in the Image field. | Multiple images can be uploaded in the image field. | Assign the first image in the Image field of the triggering form to the Image field of the target form. |
Only one attachment can be uploaded in the Attachment field. | Multiple attachments can be uploaded in the attachment field. | Assign the first file in the Attachment field of the triggering form to the Attachment field of the target form. |
Only date in the Date&Time field | Both date and time in the Date&Time field | Assign the only date in the Date&Time field in the triggering form to the Date&Time field in the target form. |
Both date and time in the Date&Time field | Only date in the Date&Time field | Assign the date in the Date&Time field in the triggering form to the Date&Time field in the target form, and set the time to 00:00:00 |
Custom
1. You can set the field value of the target form as Custom to customize the field value.

2. When the field value of the target form is set to Custom, you can customize the field value for different field types in the following ways:
Field in the Target Form | How to Customize |
Single Line, Multi Line, Radio, or Single Select | Enter text directly. |
Checkbox or Multi Select | Multiple texts can be entered and you can separate them using the Enter key. |
Number | Enter a number directly. If you enter a non-numeric content, it will be regarded as a null value. |
Date&Time | Select the date or time directly. |
Attachment | Click to upload files. |
Member, Members | Click to select members. |
Department, Departments | Click to select departments. |
Empty
You can set the field value of the target form to Empty as well.

Adding Field Values of New Records
The field value set here refers to the value that will be added to the field in the target form when no records meet the filter conditions. In this case, a new record will be added to the target form.

Note:
The following fields cannot be set in the target form: Divider, Select Data, Query Data, Signature, Serial NO., and system fields (Creator, Created Time, Updated Time).
The field value can be set to the following three types: Field Value, Custom, Empty.
Field Value
1. Set fields in the target form as fields in the triggering form. This will trigger the automatic match of field value in the target form to the field value in the triggering form.

2. For different fields in the target form, the corresponding fields in the triggering form can be set as follows:
Field in the Target Form | Field in the Triggering Form |
Single Line | Single Line, Single Select, Radio, Serial NO., or SubForm(Single Line, Single Select, Radio) |
Multi Line | Multi Line or SubForm (Multi Line) |
Number | Number or SubForm (Number) |
Single Select | Single Line, Single Select, Radio, Serial NO., or SubForm (Single Line, Single Select, Radio) |
Radio | Single Line, Single Select, Radio, Serial NO., or SubForm (Single Line, Single Select, Radio) |
Checkbox | Checkbox, Multi Select, or SubForm (Checkbox, Multi Select) |
Multi Select | Checkbox, Multi Select, or SubForm (Checkbox, Multi Select) |
Data&Time, Created Time, or Updated Time | Data&Time, SubFom (Data&Time), Created Time, or Updated Time |
SubForm field | SubForm fields |
Member | Member, SubForm (Member), or Creator |
Image | Image or SubForm (Image) |
Attachment | Attachment or SubForm (Attachment) |
Members | Members, SubForm (Members), or Creator |
Department | Department or SubForm (Department) |
Departments | Departments or SubForm (Departments) |
Workflow Status | Workflow Status |
3. When there are differences between the settings of the target form field and the triggering form field, it will be treated as a special case and handled based on the following rules.
Field in the Target Form | Field in the Triggering Form | Rules |
Only one image can be uploaded in the Image field. | Multiple images can be uploaded in the image field. | Assign the first image in the Image field of the triggered form to the Image field of the target form. |
Only one attachment can be uploaded in the Attachment field. | Multiple attachments can be uploaded in the attachment field. | Assign the first file in the Attachment field of the triggered form to the Attachment field of the target form. |
Only date in the Date&Time field | Both date and time in the Date&Time field | Assign the only date in the Date&Time field in the triggered form to the Date&Time field in the target form. |
Both date and time in the Date&Time field | Only date in the Date&Time field | Assign the date in the Date&Time field in the triggered form to the Date&Time field in the target form, and set the time to 00:00:00 |
Custom
1. You can set the field value of the target form as Custom to customize the field value.

2. When the field value of the target form is set to Custom, you can customize the field value for different field types in the following ways:
Field in the Target Form | How to Customize |
Single Line, Multi Line, Radio, or Single Select | Enter text directly. |
Checkbox or Multi Select | Multiple texts can be entered and you can separate them using the Enter key. |
Number | Enter a number directly. If you enter a non-numeric content, it will be regarded as a null value. |
Date&Time | Select the date or time directly. |
Image | Click to upload images. |
Attachment | Click to upload files. |
Member or Members | Click to select members. |
Department or Departments | Click to select department. |
Empty
If the target form field is set as Empty, no data will be added in this field.

When to Update or Add Data
- In the student information management scenario, when the student status in the Welcome Registration form is entered as registered, the student's information will be automatically updated in the Student Status form via Automations. If no existing information about the student is in the Student Status form, a new record will be created.
- In the supplier management scenario, once the manager completes the review of the form Supplier Admission, the supplier's information will be automatically synced to the form Supplier Information via Automations. If the supplier does not exist in the form of Supplier Information, the system will automatically add a record.
FAQ(s)
1. If the triggered action is Update or Add Data, the target form is a workflow form, and there is no data that meets the filter condition in the target form, a workflow will be automatically initiated.
2. When the filter condition and fields to be updated contain both fields in forms and subforms, the logic of the triggered action is as follows:
Step 1: Determine whether the target form has data that meets the filter conditions of the fields in the form.
- Yes, and then add data.
- No, and go to Step 2.
Step 2: Determine whether the target form has data that meets the filter conditions of the fields in the subform.
- Yes, and then update the data.
- No. According to the rules for adding data, a piece of subform data will be added for the record that meets the filter conditions (Only one record is supported to be added. If more than one record is filtered out, the triggered action will be unsuccessful). This action will be recorded in the log file as an Update.