


Gantt View
Introduction
Feature Overview
The Gantt view shows the sequence and duration of data through the activity list and time scale. Through the Gantt view, you can strictly control and manage the project plan, progress, and requirements.
Scenarios
- Gantt views can be used to schedule management, such as making production, project, and work plans. This will help managers evaluate work progress.
- Gantt views can also be used to display data in various scenarios, such as reserving courses, meeting rooms, parking spaces, and so on.
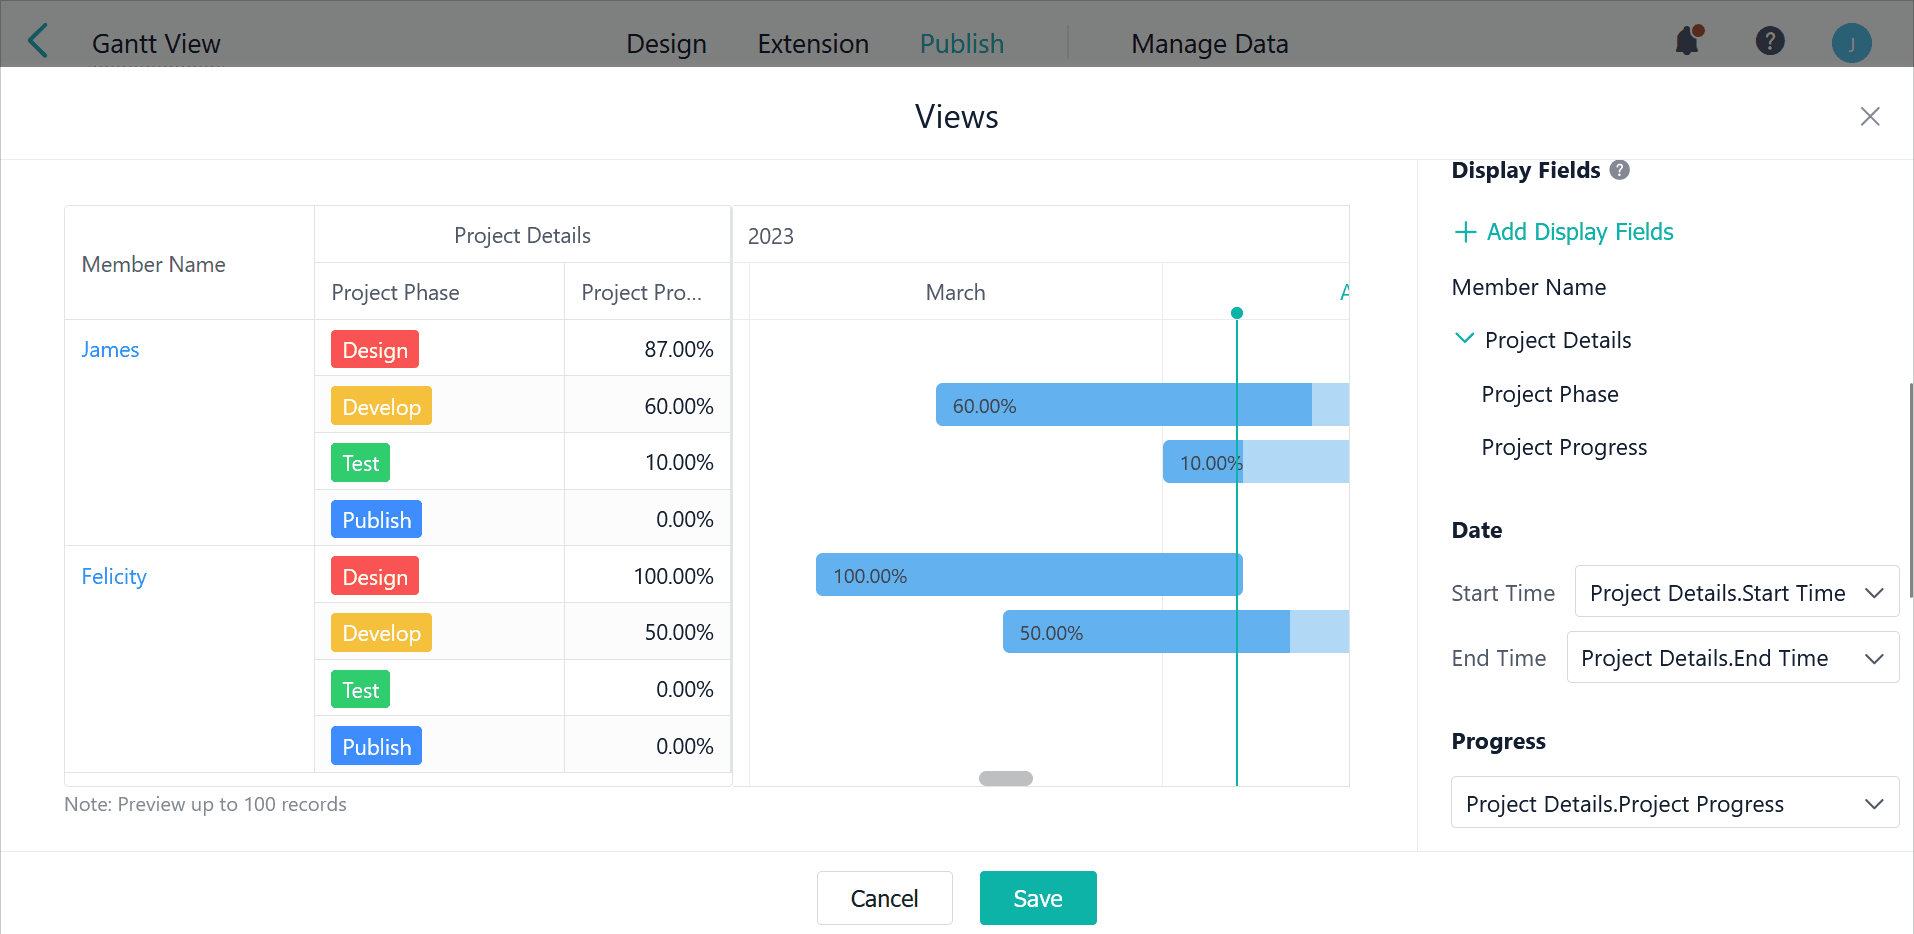
Preview
Taking a development project as an example, you can view the progress of the project based on entered project phases, as follows:

Setting Procedure
Creating a View
1. Select a form, and click Edit.

Go to Publish > Views, and click New View.

2. In addition to creating views in Publish > Views, an admin with corresponding view permissions can also create views by clicking New in the permission set.

Basic Settings of a View
1. Basic information.
After a new view is added, rename the view as Gantt View. Select PC under Default Style, and select Gantt under Type.

2. Set Display Fields.
Select the fields that need to be displayed in the view.

Note:
1. If there are multiple subforms in the form, only subfields in the same subform can be added as display fields. For example, if fields in subform A have already been added, fields in subform B cannot be added.
2. Up to 20 fields can be added, and the Record Title field counts toward the maximum number. For example, if you have ticked the Title field, you can add another 19 fields at most.
3. Set Date.
a. In the project plan, the Date includes the Start Time and End Time of the project. The Gantt chart can be fully displayed only by setting Display Fields and Date. Start Time and End Time must meet the following conditions:
- The field type of Start Time and End Time must be Date&Time, and the Type of the Date&Time fields is not YYYY-MM.
- You cannot select the same field as Start time and End time.
- If only form fields are added as display fields, Start Time and End Time must also be form fields. If subfields are added as display fields, Start Time and End Time must be subfields in the same subform.

b. The Gantt chart will not display the corresponding time bar in the following cases:
- Start Time is later than End Time.
- Start Time and End Time are empty.
- One of the values in Start Time and End Time is empty.
4. Sort fields/records.
a. Sort fields.
Field order is the sequence of fields displayed in the view. When setting the view, you can adjust the field order by dragging and dropping the fields:
b. Sort records.
Sorting records refers to row sorting, which controls the display order of records in rows. Click Add Sort under Default Sorting Rules, then customize a sorting order.

Note:
Each field can only be included in a sorting rule once, and you can add a maximum of five sorting rules.
5. Set Progress.
When you select the corresponding progress and hover the mouse over the record, the corresponding progress data will be displayed in the pop-up display box.
The fields selected from the drop-down list of progress need to meet the following conditions:
- The field type is the Number field.
- If display fields are not set, fields under progress need to be Number fields.
- If only form fields are set as display fields, fields under Progress must also be form fields. If subfields are set as display fields, fields under Progress must be subfields from the same subform.

6. Set Zoom Level.
The Gantt chart can be zoomed into four dimensions: Day, Week, Month, and Quarter.

7. Set Data Label.
a. Select the corresponding data label, and the corresponding data will be displayed on the Gantt chart. For example, if progress is selected as the data label, the corresponding progress data will be displayed on the Gantt chart.

b. Field type of data label.
Field types supported to be set as the data label are as follows:
Field Classification | Field Type |
Text | Single Line, Single Select, Radio, Serial No., and URL Parameter |
Number | Number |
Date&Time | Data&Time, Created Time, and Updated Time |
Member or Department | Member, Department, and Created User |
c. Field rules.
- If display fields are not set, the data label needs to meet the above types.
- If only form fields are added as display fields, fields under Data Label must also be form fields. If subfields are added as display fields, fields under Data Label must also be subfields from the same subform.
8. Set Color.
You can choose the view color of the Gantt chart based on your needs in the following two ways:
- Apply a Single Color to All: All progress bars are colored uniformly, allowing for both system preset colors and custom color schemes.
- Follow the Color of the Selected Field: Progress bars display different colors based on the selected field, such as task type, priority, or owner.

9. Group records.
When setting views, you can add grouping rules to categorize records.
Go to "Publish > Views > + New View >Gannt > Default grouping rules" and click "Add a group " to choose a field to categorize records.

When previewing data in permission sets, you can also click the icon in the upper right corner of the Gantt Chart view to add grouping fields for grouping settings, as shown below:

Please note that a maximum of 3 fields can be added as grouping fields.
When previewing data in permission groups, you can expand all/collapse all groups with just one click, as shown below:

10. Add filter conditions.
When setting views, you can add corresponding filter conditions based on your needs in Default Filter Conditions:

Note:
When you filter data based on the Date&Time field, you can set a dynamic filter condition. Set the filter relationship as is within, and you can select the following filter values:
Today, Yesterday, Tomorrow, This Week, Last Week, Next Week, This Month, Last Month, Next Month, This Quarter, Last Quarter, Next Quarter, Last 7 Days, Last 30 Days, This Year, Last Year, Next Year.
Saving and Setting Application Scope
After all settings are completed, click Save. If you save the Gantt view for the first time, you can directly set the application scope of the view. For details, see Views in Permission Sets on PC.

Granting Permissions
Go to Publish > To Members, and you can assign permissions to members who can use this view.

Demonstration
1. Add records.
Members with permission to add records can click Add to add records in this Gantt view.

2. Batch settings.
Select multiple records, then export, delete, and edit them in batches.

3. View records.
- Hover the mouse over the time bar of the record, and you can view the information such as start time, end time, and so on.
- Click the time bar of the record, and you can go to the record details page to view detailed information.

4. Modify records.
Members who have permission can modify the time of the project based on the project's progress through the view.
- Drag the entire time bar, and you can adjust the overall duration of the project.
- Drag one end of the time bar, and you can adjust the start/end time of the project.

Note:
Dragging the time bar normally triggers actions such as Data Linkage, Formula, and Automations.