


Add Record
The Add Record nodes add record(s) to the target form, assigning values stored at a preceding node or custom values to the target fields.
Scenarios
Scenario Name | Problem Statement | Solution on Jodoo |
Order Management | How to send an outbound order to the warehouse right after a sales order is generated? | The Add Record node triggered by a newly-added Sales Order adds to the Outbound Order form. |
Customer Management | How to add a new contact's company/organization information to the database without redundancy. | The Add Record node triggered by a newly-added Contact adds to the Customer Info form. |
Preview
In the order management scenario, when a client submits a sales order, it triggers Automations Pro, and an outbound order is added.

Setup Steps
Create an Automations Pro, enter the design page, configure the Trigger node, and continue the following steps.
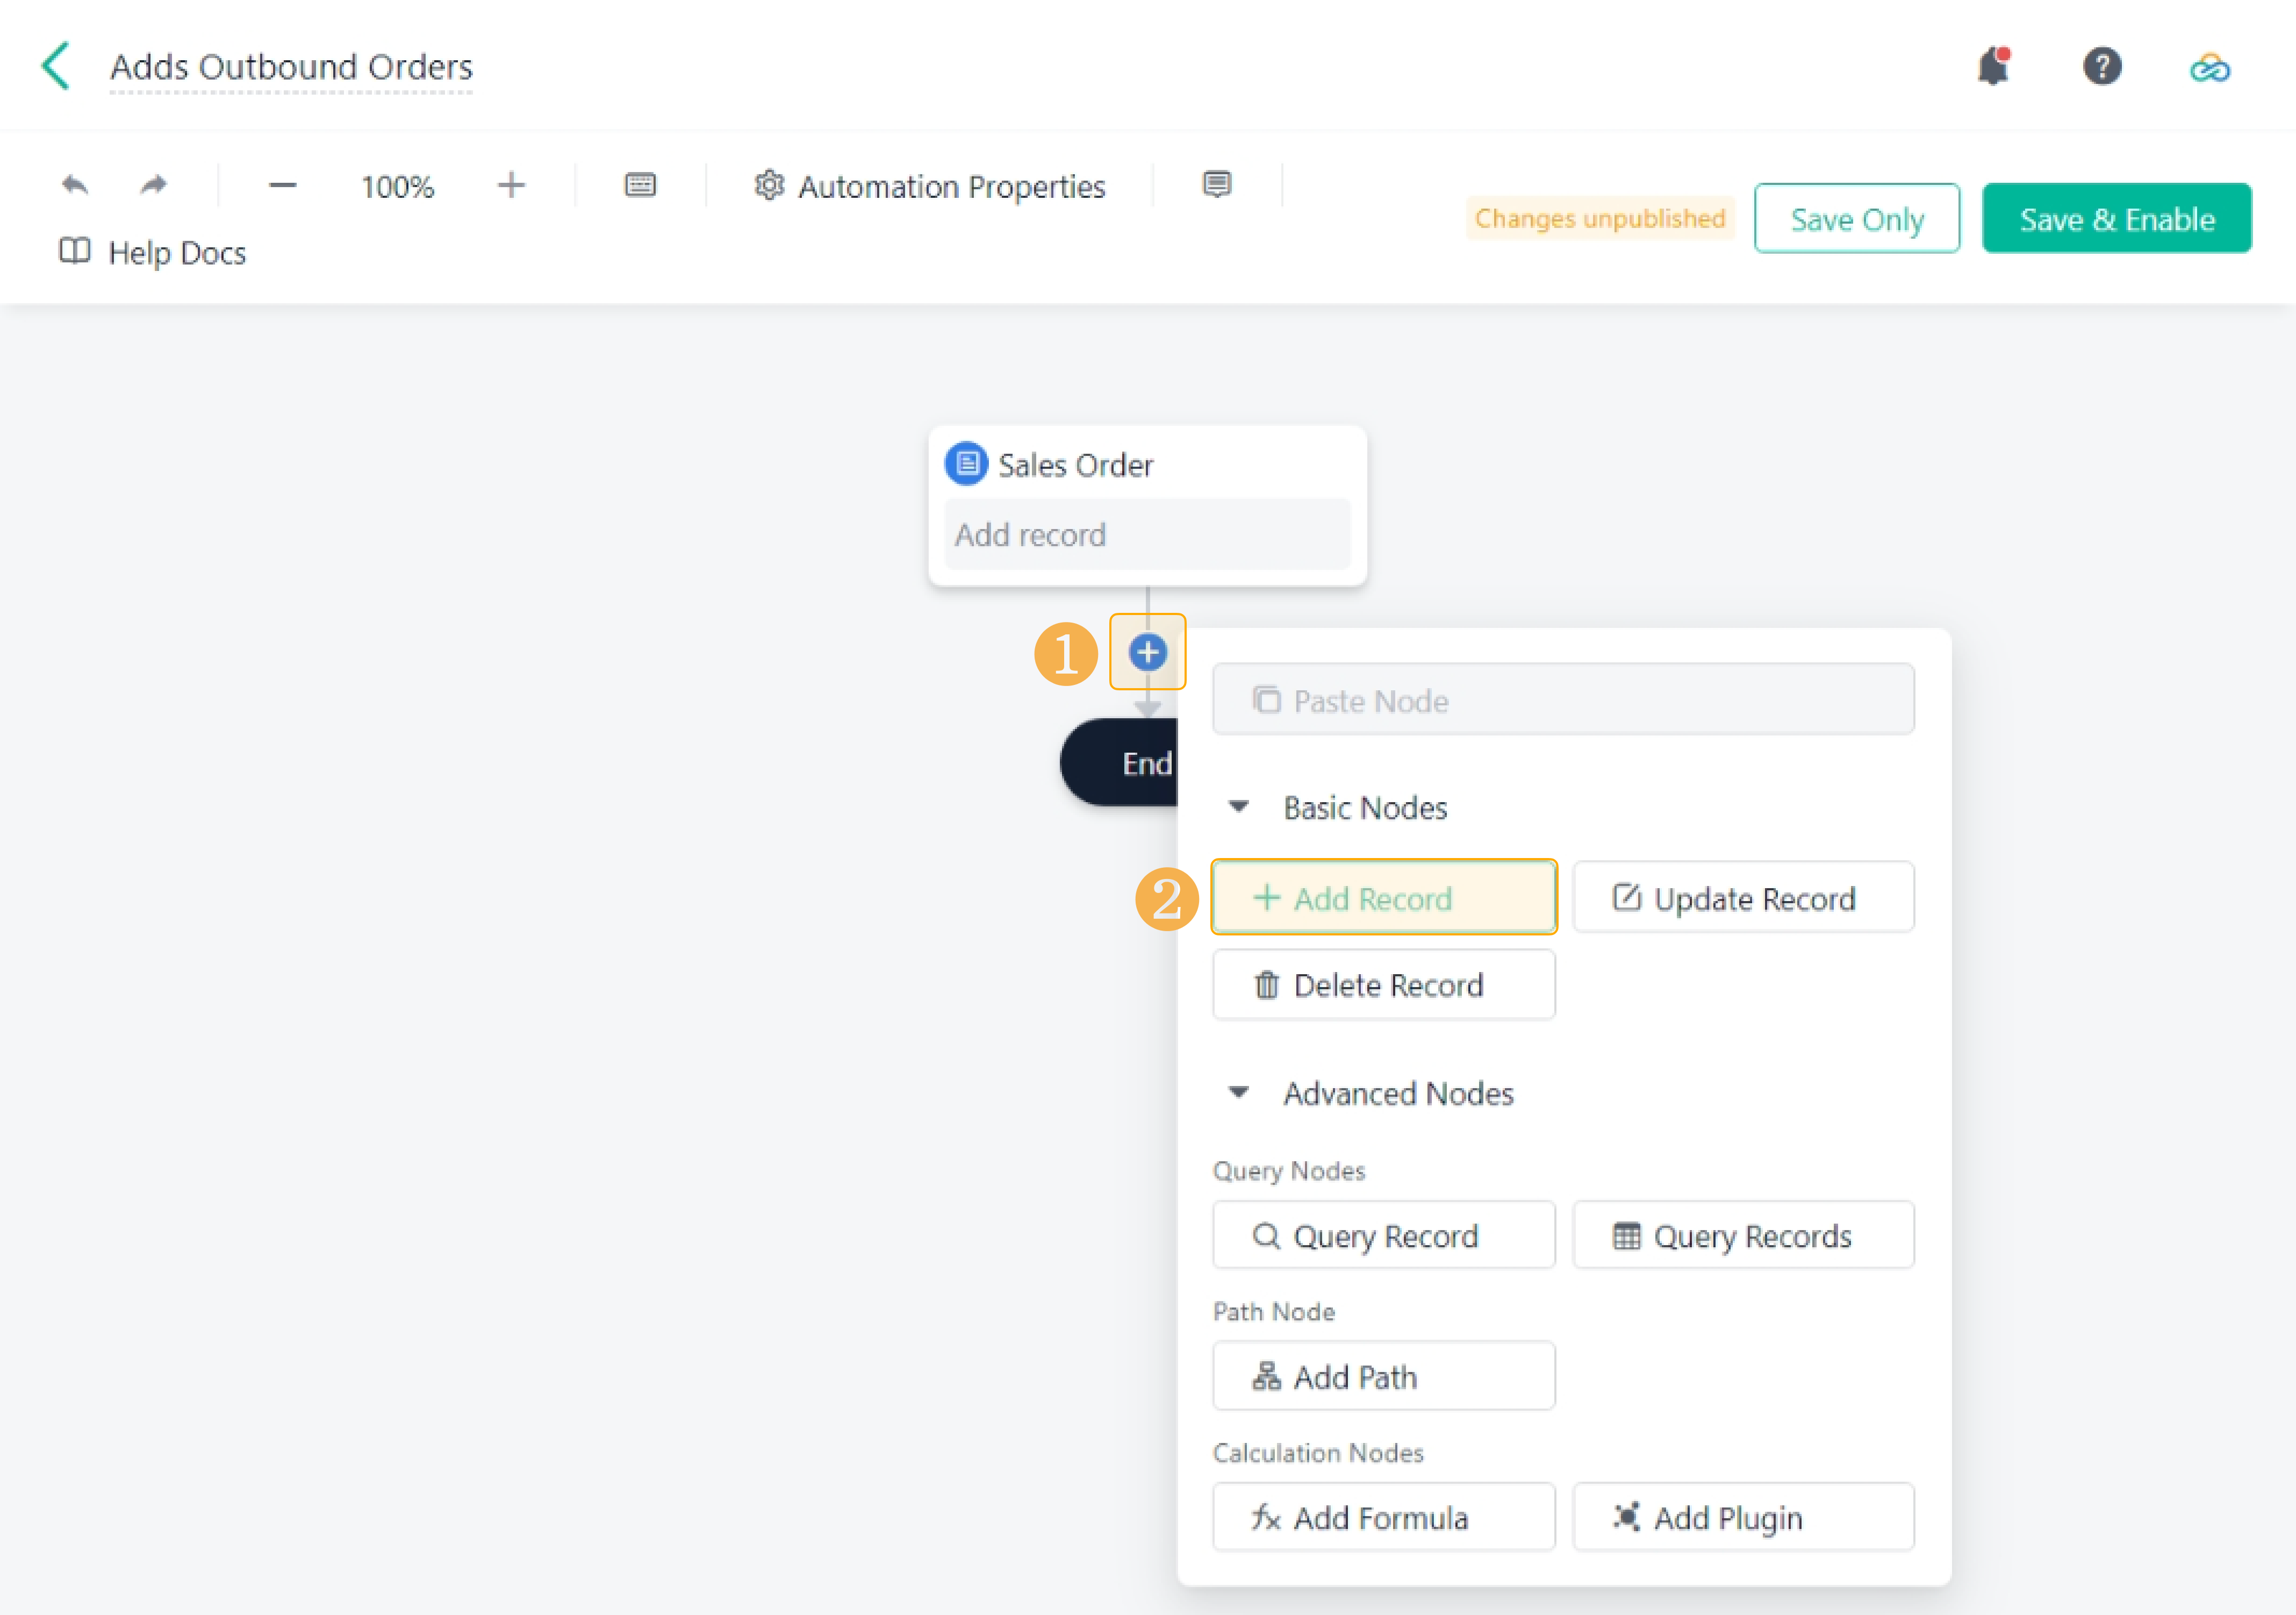
Adding the Action Node
Add an Add record node after existing node(s).
Selecting the Target Form
At Add Record, select a target form, to which the node adds records. You can select forms at the current app or from another app.

Setting for Value Assignment
Set the field values for the to-be-added records:
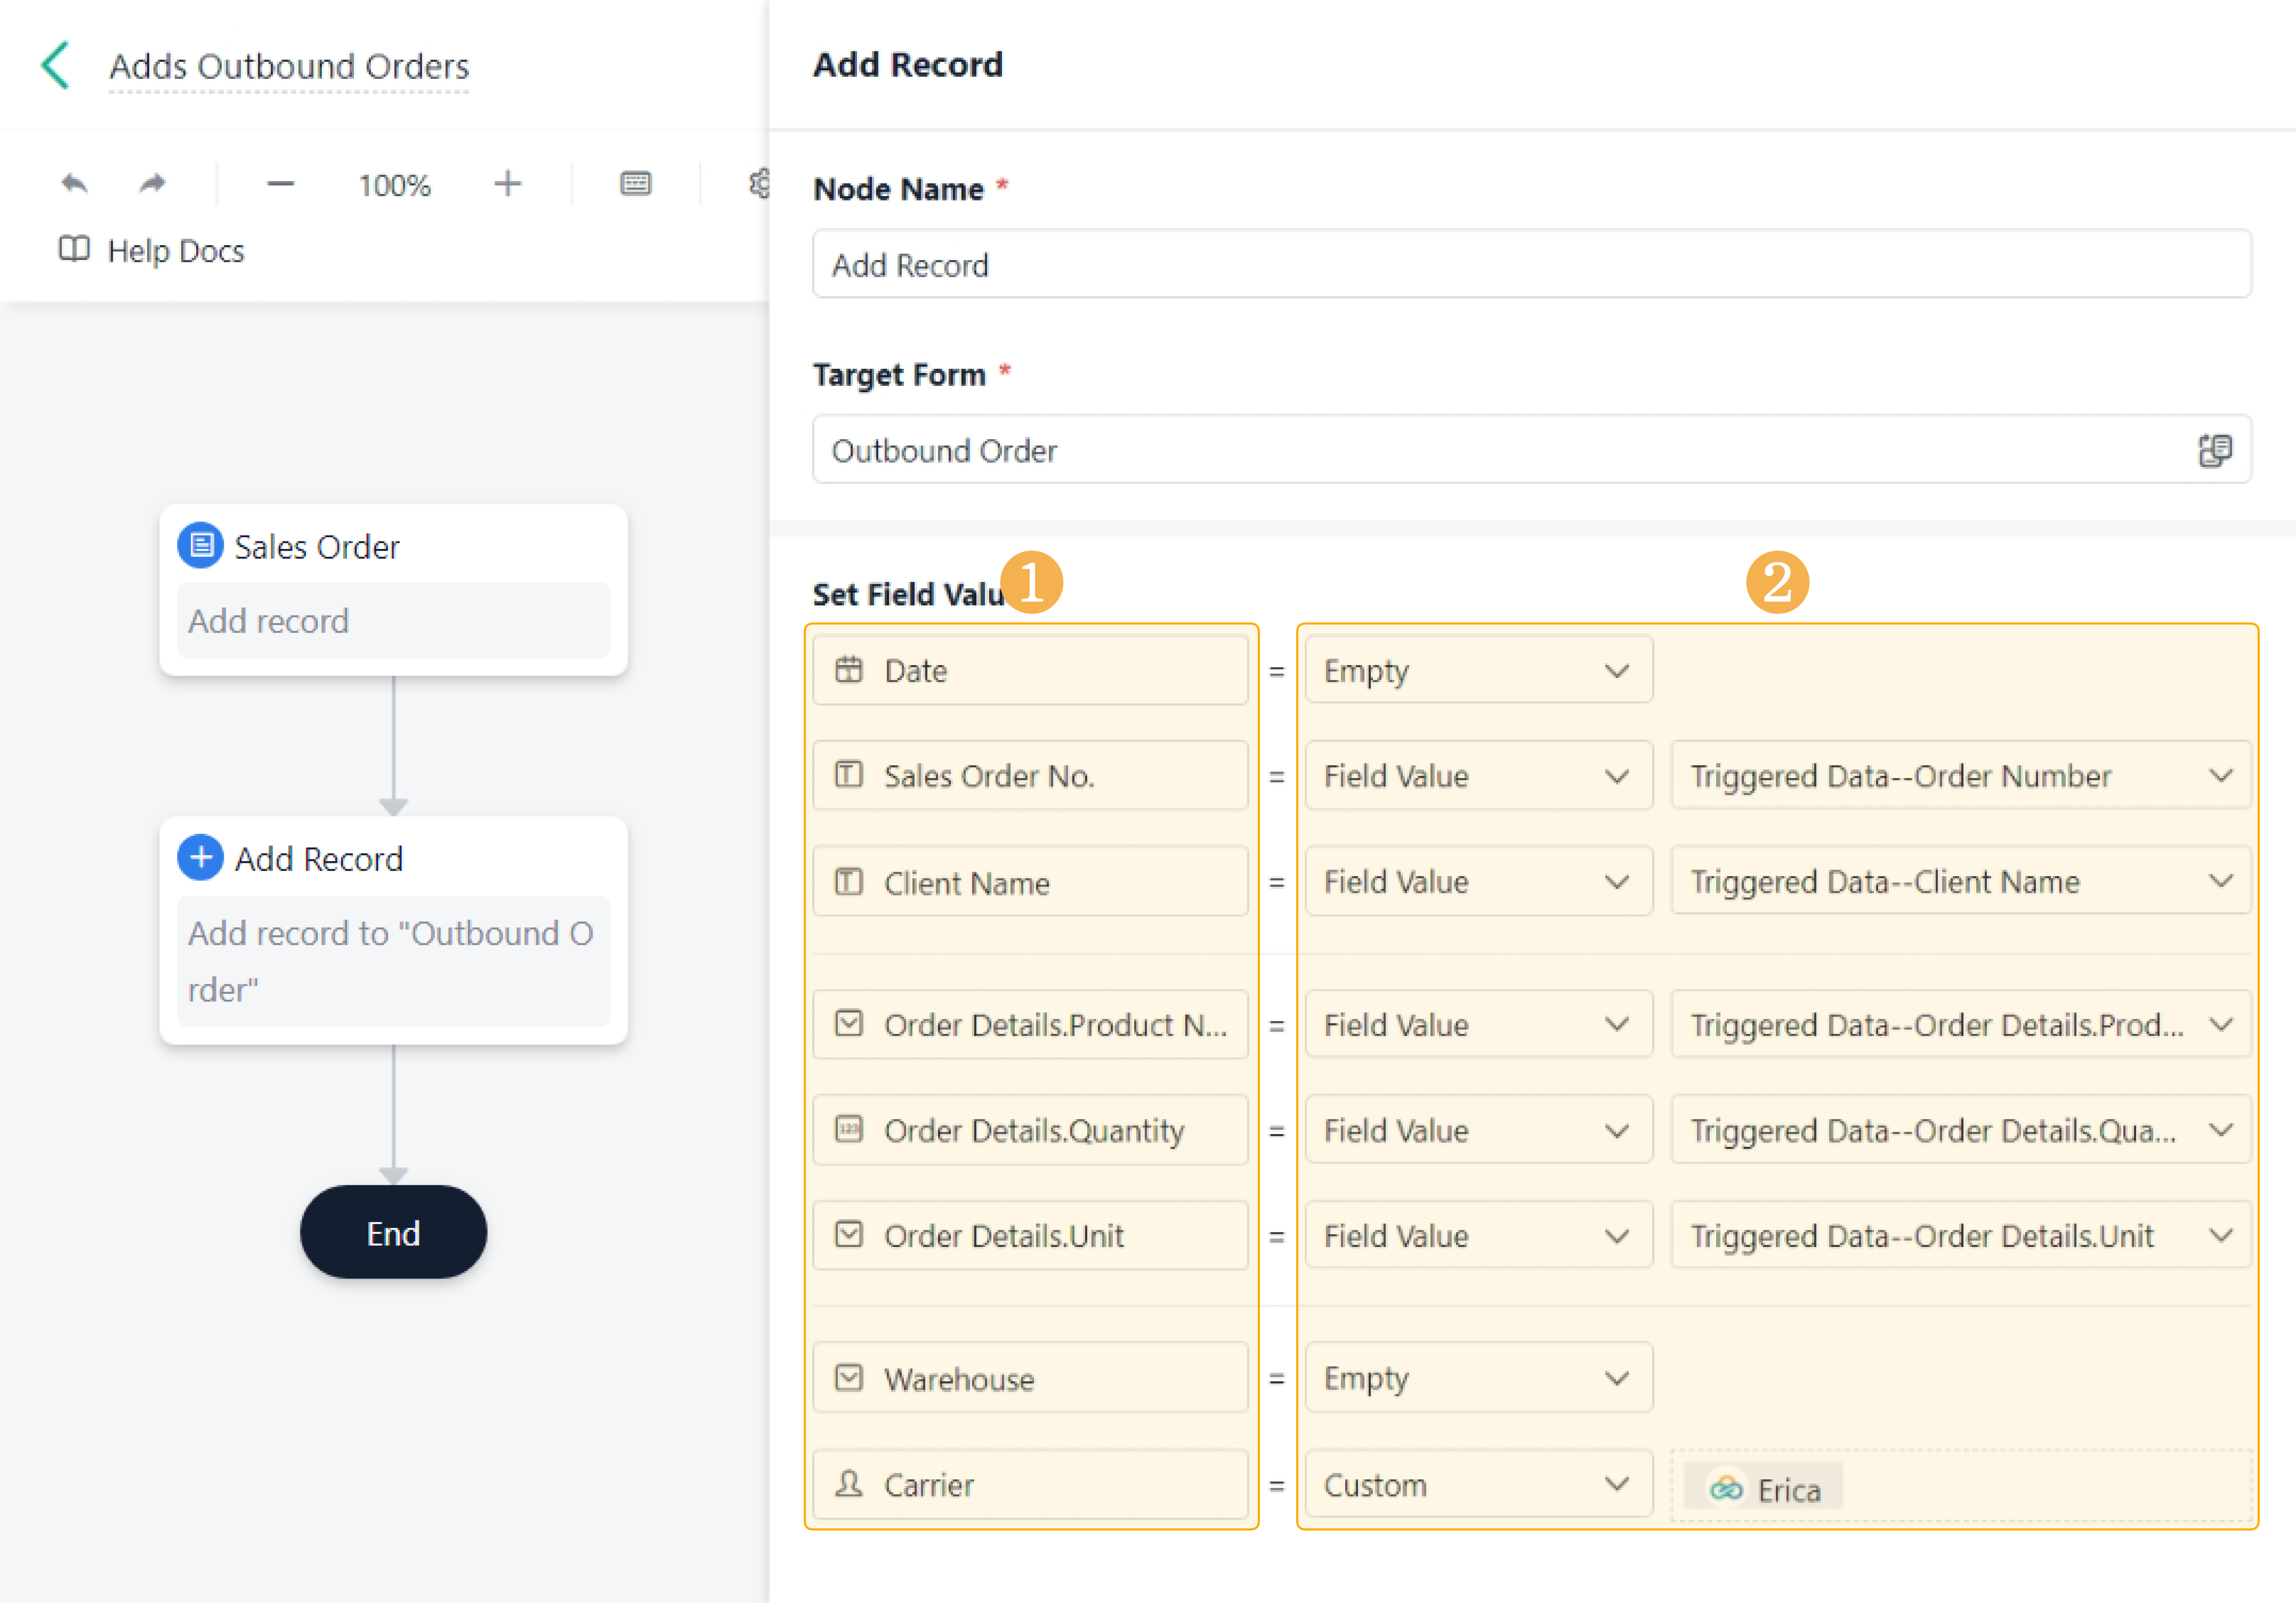
You can choose to assign target fields as Field Value, Custom, or Empty.
Note:
1. Field Value is the field value stored at preceding nodes (including the Trigger node and action nodes). In the following passage, it will be referred to as "field (value) of the node".
2. In the target form, the following fields cannot be assigned: Divider, Select Data, Query Data, Signature, Serial No., Button, and system fields (Created User, Created Time, and Updated Time).
1. Field Value
a. If you choose Field Value, you can assign values stored at the preceding nodes to the fields in the target form. This feature is frequently used in the scenario of data synchronization.

b. Here are the nodes can be used as the value source: the Trigger node, Query Record, Query records, Add record, Add formula, and Add Plugin.
- When there exist multiple preceding nodes, they can be used together in value assignment.
- When the automation is set to be triggered by Scheduled Trigger > Custom Time, there would not be trigger data at the Trigger node; it cannot be used to assign values.
c. The corresponding fields at the node vary among target field types:
Fields in Target Form | Fields at the Node |
Single Line Single Select Radio | Single Line, Single Select, Radio, URL Parameter, Serial No., SubForm (Single Line, Single Select, Radio) |
Multi Line | Multi Line, SubForm (Multi Line), Single Select, Radio, Serial No., Add Formula nodes (textual results), Add Plugin nodes (textual return parameter), textual fields from Trigger Data (Triggered by HTTP) |
Number | Number, SubForm (Number), Records amount (of Query Record/Records nodes) |
Checkbox Multi Select | Checkbox, Multi Select, SubForm (Checkbox, Multi Select) |
Date&Time | Date&Time, SubForm (Date&Time), Created Time, Updated Time, Trigger Time(can be selected only if the trigger method is button trigger) |
Subform fields | SubFields |
Image | Image, SubForm (Image) |
Attachment | Attachment, SubForm (Attachment), retrieved print file from the Generate Print File Node |
Member | Member, SubForm (Member), Created User, Triggered by(can be selected only if the trigger method is button trigger) |
Members | Members, SubForm (Members) |
Department | Department, SubForm (Department) |
Departments | Departments, SubForm (Departments) |
d. Exceptions—When the settings of the fields in the target form and the fields at the node differ as follows:
Fields in the Target Form | Fields at the Node | Solutions |
You can only upload one image in the Image field. | You can upload multiple images in the Image field. | Assign the first image of the Image field at the preceding node to the Image field in the target form. |
You can only upload one attachment in the Attachment field. | You can upload multiple attachments in the Attachment field. | Assign the first document of the Attachment field at the preceding node to the Attachment field in the target form. |
Only date is displayed in the Date&Time field. | Date and time are both bdisplayed in the Date&Time field. | Assign the date value of the Date&Time field at the preceding node to the Date&Time field in the target form, and discard the time value. |
Date and time are both displayed in the Date&Time field. | Only date is displayed in the Date&Time field. | Assign the date value of the Date&Time field at the preceding node to the Date&Time field in the target form, and set the time as 00:00:00. |
2. Custom
a. You can customize the values that will assign to the fields of the target form. The feature is suitable for personalized and customized scenarios.

b. For different types of fields in the target form, the settings for custom values are different:
Fields in the Target Form | How to Set |
ingle Line Multi Line Radio Single Select | Input text. |
Checkbox Multi Select | Input multiple texts, and press Enter to separate them. |
Number | Input numbers, and non-number values will be considered as empty. |
Date&Time | Select date/date and time. |
Member Members | Click to select members. |
Department Departments | Click to select departments. |
3. Empty
You can set the fields in the target form as empty. It is suitable for the scenarios that do not require field value.

Notes
General Illustrations
1. If the target form is a workflow form, the workflow will be automatically initiated after the automation performs the Add Record action and a new r ecord is submitted to the target form.
2. To set for the update of subfields, you should obey SubForm Assignment Rules. To avoid previous assignment settings being invaliated when they conflict against a new assignment equation, we hide the conflict fields in the drop-down menu that only provides compatible fields.
If you want to view all the available fields, hover your cursor over , and click Show all fields:

3. The Add Record node adds up to 200 records at a time, and within each record, up to 200 subform record can be added.
If an Automations Pro can trigger other Automations Pro, they form a nested trigger system and several trigger series (in the diagram below, Pro 1 to 6 form a nested structure; Pro 1 >> Pro 2 >> Pro 4, Pro 1 >> Pro 3 >> Pro 5, and Pro 1 >> Pro 3 >> Pro 6 are three trigger series). In this case, there are additional quantity limits:
- Within a single trigger series, a maximum of 1000 records can be added cumulatively.
- Within the entire trigger system, a maximum of 10,000 records can be added cumulatively each hour.

Value Assignment at Add Record Nodes

In value assignment, the types of selected source fields for the target fields decide the available field types for the target subfields:
Note:
1. Before this, refer to Beginner Guide (Automations Pro) > Terms, to understand the definitions of single-value and multi-value sources/fields.
2. When you add the new records with both (main) fields and subfields, and use multi-value fields to assign values to them, make sure the data source for value assignment of fields and subfields from the same subform should be the same one. For details, see SubForm Assignment Rules.
Data Source for (Main) Fields in Target Form | Data Source for SubFields in Target Form | What will be added? |
Only single-value fields are used, like:
| Single-value fields:
| One record. |
Multi-value fields:
| ||
Multi-value fields are used, like:
| Single-value fields:
| Multiple records. |
Multi-value fields are used, like:
| Single-value fields:
Multi-value fields:
|