


How to build an automated enrollment confirmation flow for your class registration form?
Did you know that 85% of Capterra reviewers consider enrollment confirmation one of the most valued features in class registration systems? Whether you are offering an online IT course or a weekly Pilates class, save your time and reduce stress now with an efficient, automated, and streamlined registration process.
With Jodoo workflow, you can easily automate your registration and confirmation processes without any technical skills. In just five minutes, you can create a streamlined system that collects registration details, reviews them, and sends confirmation emails—all using a simple drag-and-drop interface. It's never been easier to build a reliable system for any educational, training, or recreational class.

Here's what we'll cover in this guide:
- Get a free, customizable, and embeddable class registration and confirmation workflow template.
- Follow a step-by-step guide to build the automated registration confirmation workflow in just five minutes using the Jodoo plugin.
- Learn three useful tips to extend your workflow capabilities.
Get Your Free Class Registration and Confirmation Form
In the world of event or class registrations, an automated approval flow ensures that each registration is processed consistently and on time. This reduces errors and saves you countless hours that would otherwise be spent on manual tasks.
Our free class registration and confirmation form is designed to boost your registration collection, confirmation, and management. Best of all, you can drag and drop to easily customize form styles and behaviors, integrate it with your favorite marketing tools, or embed it on any website—including WordPress—all without any coding.
Install this free class registration and confirmation form to make registrations a breeze with Jodoo.

Explore the template center for 100+ free form templates.
How to build your enrollment confirmation workflow?
Jodoo workflow enables you to build automated workflows to send confirmation emails through third-party marketing automation platforms, such as Mailchimp and SendGrid. You can customize your workflows with sequential approvers, conditional branches, plugin nodes, and more, all without any coding.
Below is a step-by-step guide to creating an automated enrollment confirmation workflow with the Jodoo Mailchimp plugin based on the free class registration and confirmation form. You'll have it up and running in just five minutes.
Step one: create and set up your journey in Mailchimp
One of the biggest common concerns for students is whether their registration was received and what to expect next. A confirmation email reassures them, sets clear expectations, and provides details about the class, such as how to attend the class.
To send confirmation emails to students securely, you can build a journey in Mailchimp, a popular marketing automation platform for small businesses.
1. Log into your Mailchimp account, go to Automations > Overview, then click Build from scratch.

2. Name your journey and select your Audience, then click Start Building.

3. Click Choose A Starting Point > Contacts Activity, select Signs up for Email, and Save Starting Point.

4. Click Add a journey point > Rules > If/Else, set the condition based on the Confirmed Registration tag to filter registrations, and click Use segment.

5. Add two journey points to Send email for the conditional branch (confirmed and declined). Customize the settings accordingly, including To & From, Subject, Preview Text, Schedule, Tracking, and Email Content.

6. Click 
to activate your journey.
You can add more journey points to customize your workflow, like tagging senior students or sending a feedback email a few days later. For more details, read Mailchimp's guide on creating a customer journey.
Step two: install and enable the Mailchimp plugin in Jodoo
Now, let’s install and enable the Jodoo Mailchimp plugin to integrate Jodoo with Mailchimp to automate your confirmation process.
1. Go to Jodoo's Plugin Market and install the Mailchimp plugin.

2. On the Plugin page, click to update the required parameters:

- API Key: Go to your Mailchimp Profile > Extras > API keys to Create A Key and paste it into Jodoo.

- Server Prefix: After logging into Mailchimp, look at the URL in your browser. You’ll see something like https://us19.admin.mailchimp.com/; the us19 part is the Server Prefix. Note that your specific value may be different.
3. Click OK to save the plugin configurations and click to enable the plugin.
Step three: add and configure plugin nodes in Jodoo
Now, we’ll connect your form to the Mailchimp journey using plugin nodes. Once connected, you’ll be able to trigger automated confirmation emails or failure notifications based on the registration status.
1. On the form's Workflow page, go to Version (V1) > Add New Version, and remove the connection between the Review Registration and End nodes.

2. Drag and drop to add a Plugin Node for confirmed registrations. Go to Node Properties > Plugin Configuration, select Mailchimp, set the action to Add or update member, update the required parameters, and click OK to save the configurations.
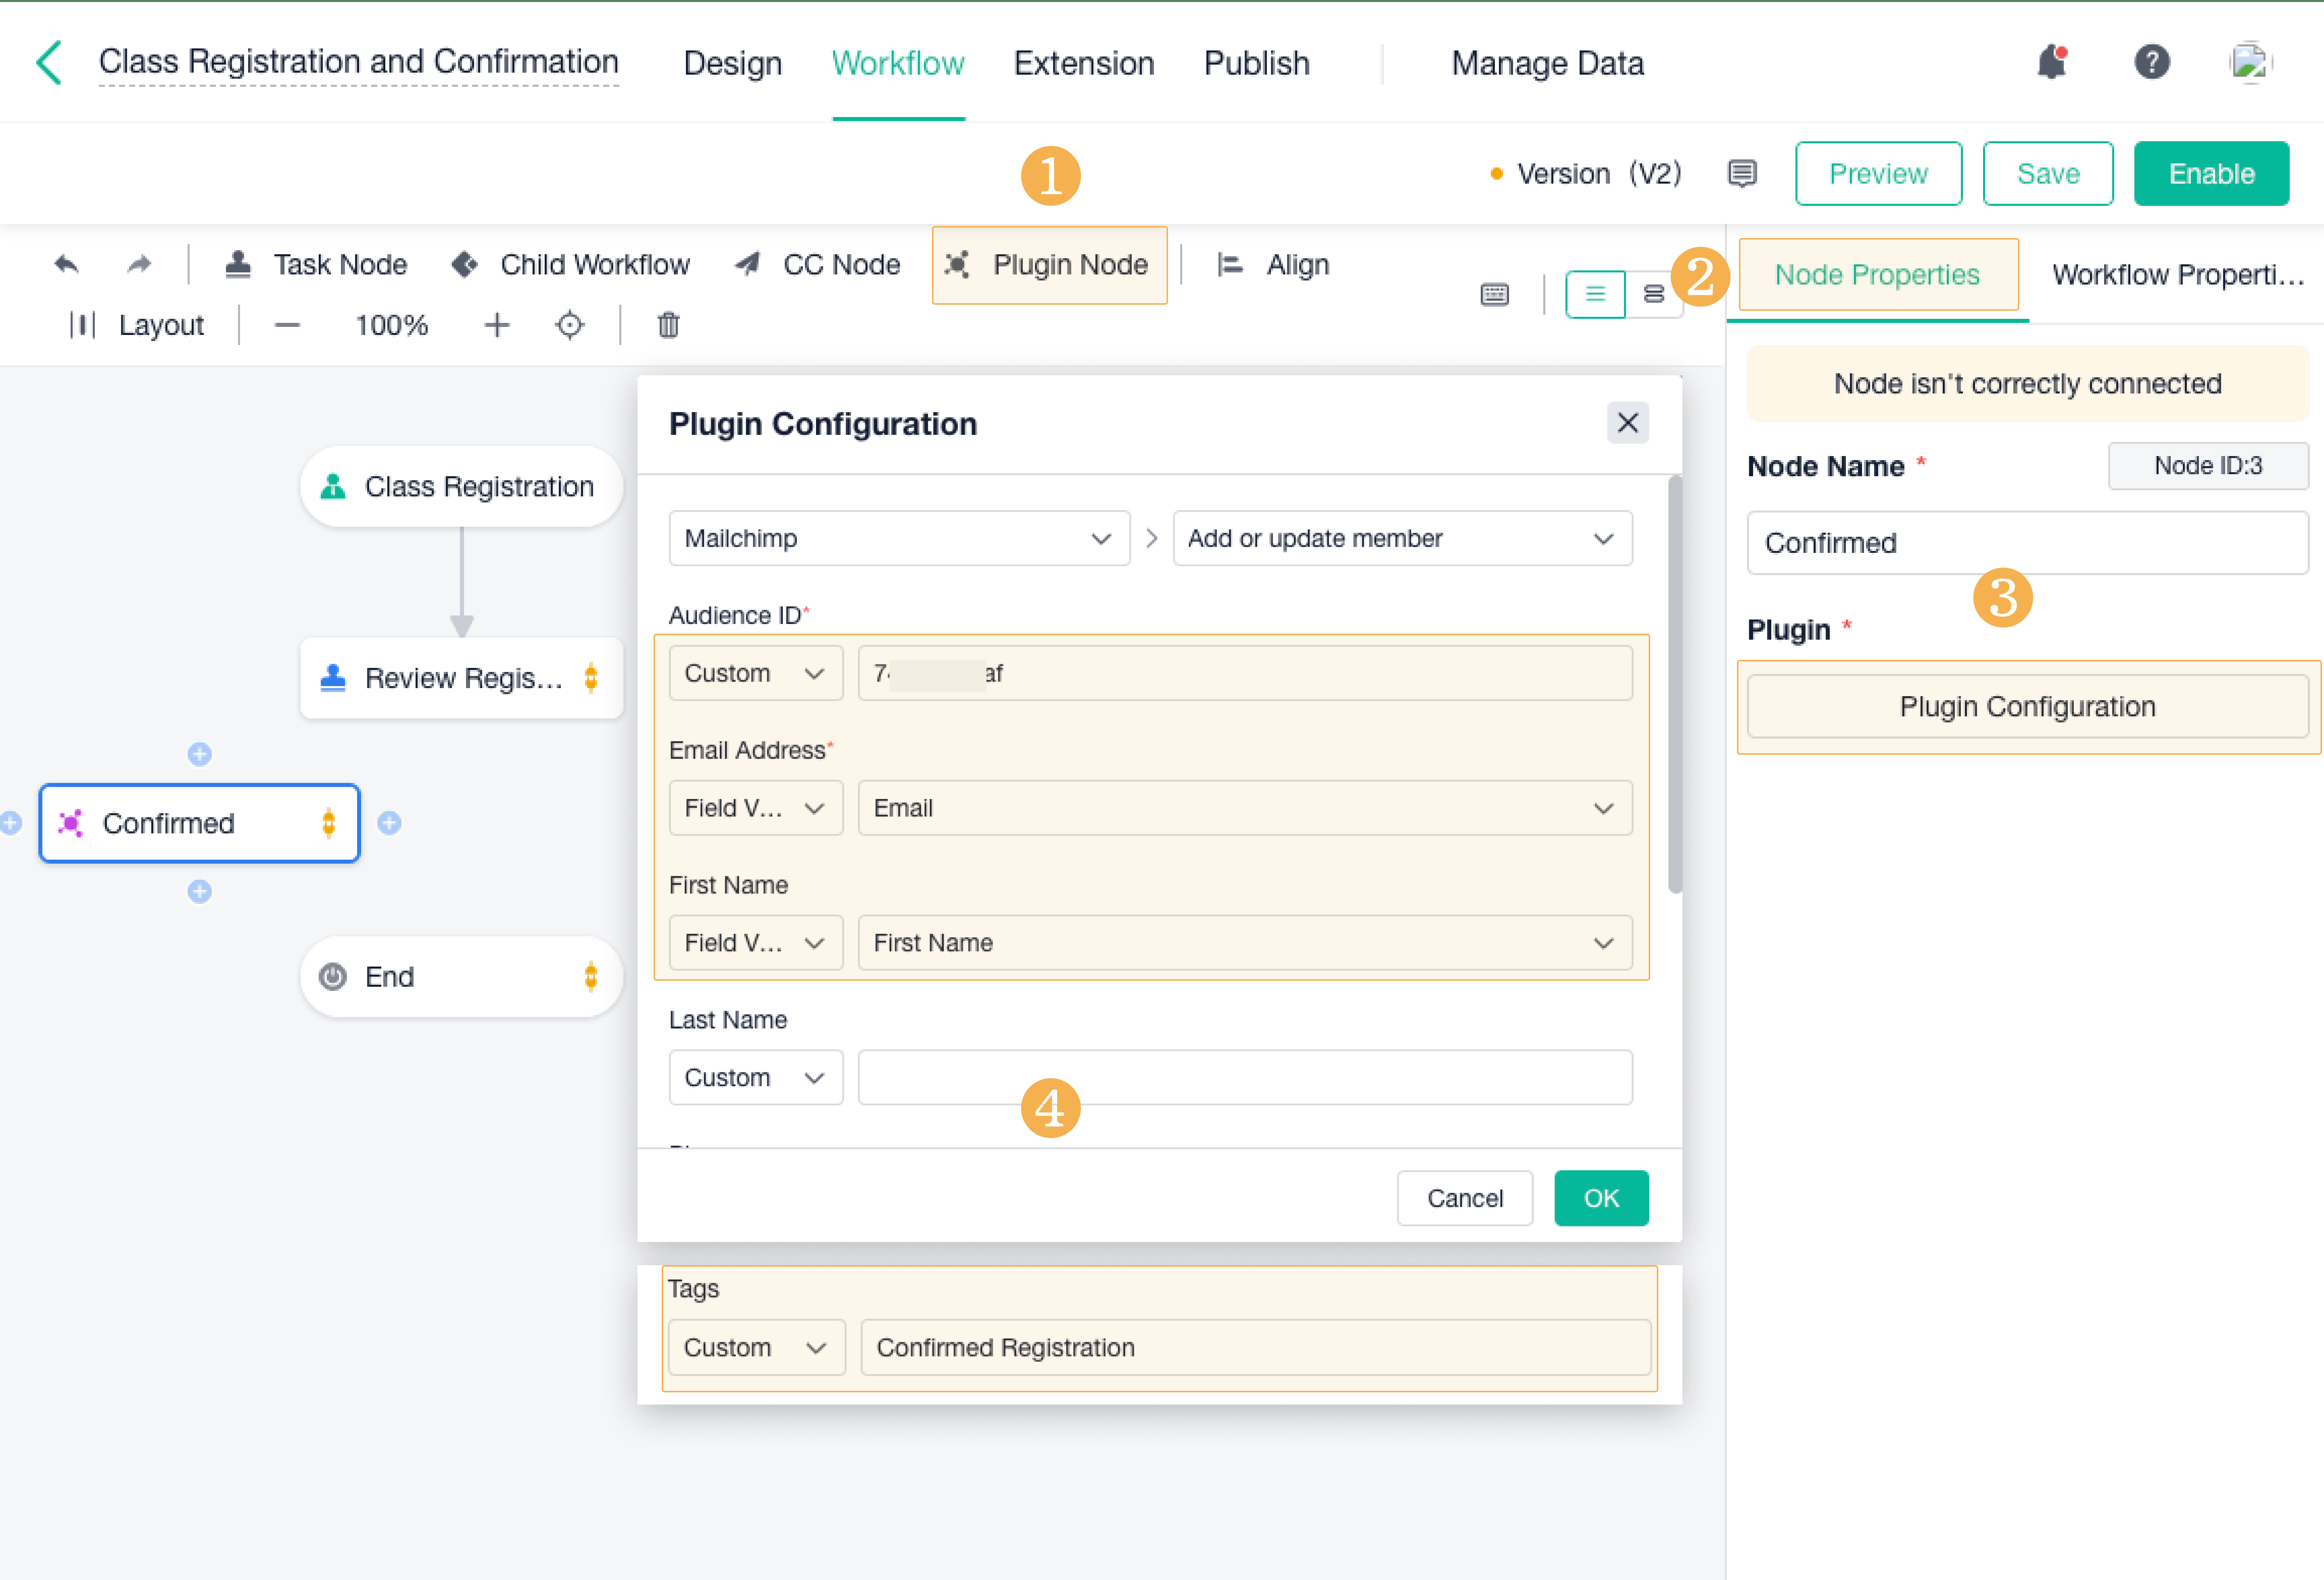
- Audience ID: Go to Audience > Audience dashboard > Current audience to select your target audience. Then go to Manage Audience > Settings to find the Unique Audience ID.

- Email Address: Use the Field Value of the Email field.
- First Name: Use the Field Value of the First Name field.
- Tags: Set the tag for the confirmed registrations as Confirmed Registration.
5. Clone the Confirmed node for declined registrations to send failure notifications. Repeat these settings, but leave the Tags empty.

6. Connect the Review Registration, Confirmed, Declined, and End nodes. Set the Node Connections accordingly to ensure the correct journey is triggered.

7. Enable the workflow, publish this form, embed it on your website, and watch as new registrations are automatically routed for review, with students receiving automated confirmations.

All registrations will be neatly and securely stored in Manage Data, ready to be managed online or exported to Excel or PDF files.
What else you can do to maximize your form?
Limit registrations to manage overflow
According to Eventbrite, setting limits on class registrations can help manage overflow and avoid overcrowding in popular sessions. In Jodoo, you can set a rule to automatically close registrations once a limit is reached and redirect excess registrations to a decline notification.
To do this:
1. Use the MAPX function in Field Properties: MAPX("count",Courses,Courses,Student Name)+1, to calculate total registrations.
2. Set a conditional rule for the Node Connection to redirect the overflowed registrations to the Declined node.
This ensures that students who register after capacity has been reached receive a polite, automated decline.

Set registration deadlines to automate changes
Deadlines help create urgency and manage expectations. In Jodoo, you can set a validity period to automatically close registration forms once the deadline has passed.
To do this:
1. Go to the Publish page > To All > Form Fill Link > Form Fill Limit and Set Validity Period.
This keeps your registration process neat and organized.

Assign sequential approvers to review registrations
Jodoo workflow allows you to assign Node Approvers for each registration. Whether it’s a department head or a dynamic team member, you can build a sequential approval process that moves from one approver to the next. This is especially useful for large classes or organizations with multiple decision-makers.

FAQs
What is a enrollment confirmation workflow?
An enrollment confirmation workflow automates the approval process for class registrations and sends confirmation emails to students.
How do I add my class registration and confirmation form to a website for free?
Add your form to your website using an auto-generated embed code.
On the Publish page, go to the To All tab, enable the Form Fill Link, open Advanced settings, copy the Reference Code, and paste it into your website's HTML.
Do I need coding know-how to create forms or workflows with Jodoo?
Not at all! Jodoo's drag-and-drop builder makes it easy to create forms and workflows without any coding experinece.
Can I customize my registration workflow?
Absolutely! You can personalize and brand the look, feel, and behavior of your workflow, ensuring it fits perfectly with your website and branding.
I have finished reading. 🏆
👉 Start with the Class Registration and Confirmation Form or Create Class Registration Form from Scratch
👉 Need more help? Join our Discord Forum