


Rules of Data Linkage
With data linkage, you can retrieve data that meets certain conditions in one form or aggregated table in another form. Data linkage helps you fill in the fields automatically. It also helps when the current field or option needs to be automatically filled in or updated according to the linked field.
Application Scenario(s)
- In the case of user registration, if you select Marketing Department for the first option, you can only select the member from Marketing Department on a user level for the second option.
- When you retrieve product information, the product price can be filled in automatically through data linkage after you select the product name or ID.
Preview
In user management, to retrieve the gender and birthday information with the user name, you can set up the data linkage for Gender and Birthday in the User Information form. Then the gender and birthday information will be automatically filled in after you enter a user name.

Rule(s) of Data Linkage
Supported Field Type(s)
Data linkage is available for the below field types: Single Line, Multi Line, Number, Date&Time, Image, Attachment, Single Select, Multi Select, SubForm, Member, Members, Department, and Departments.
Where to Set
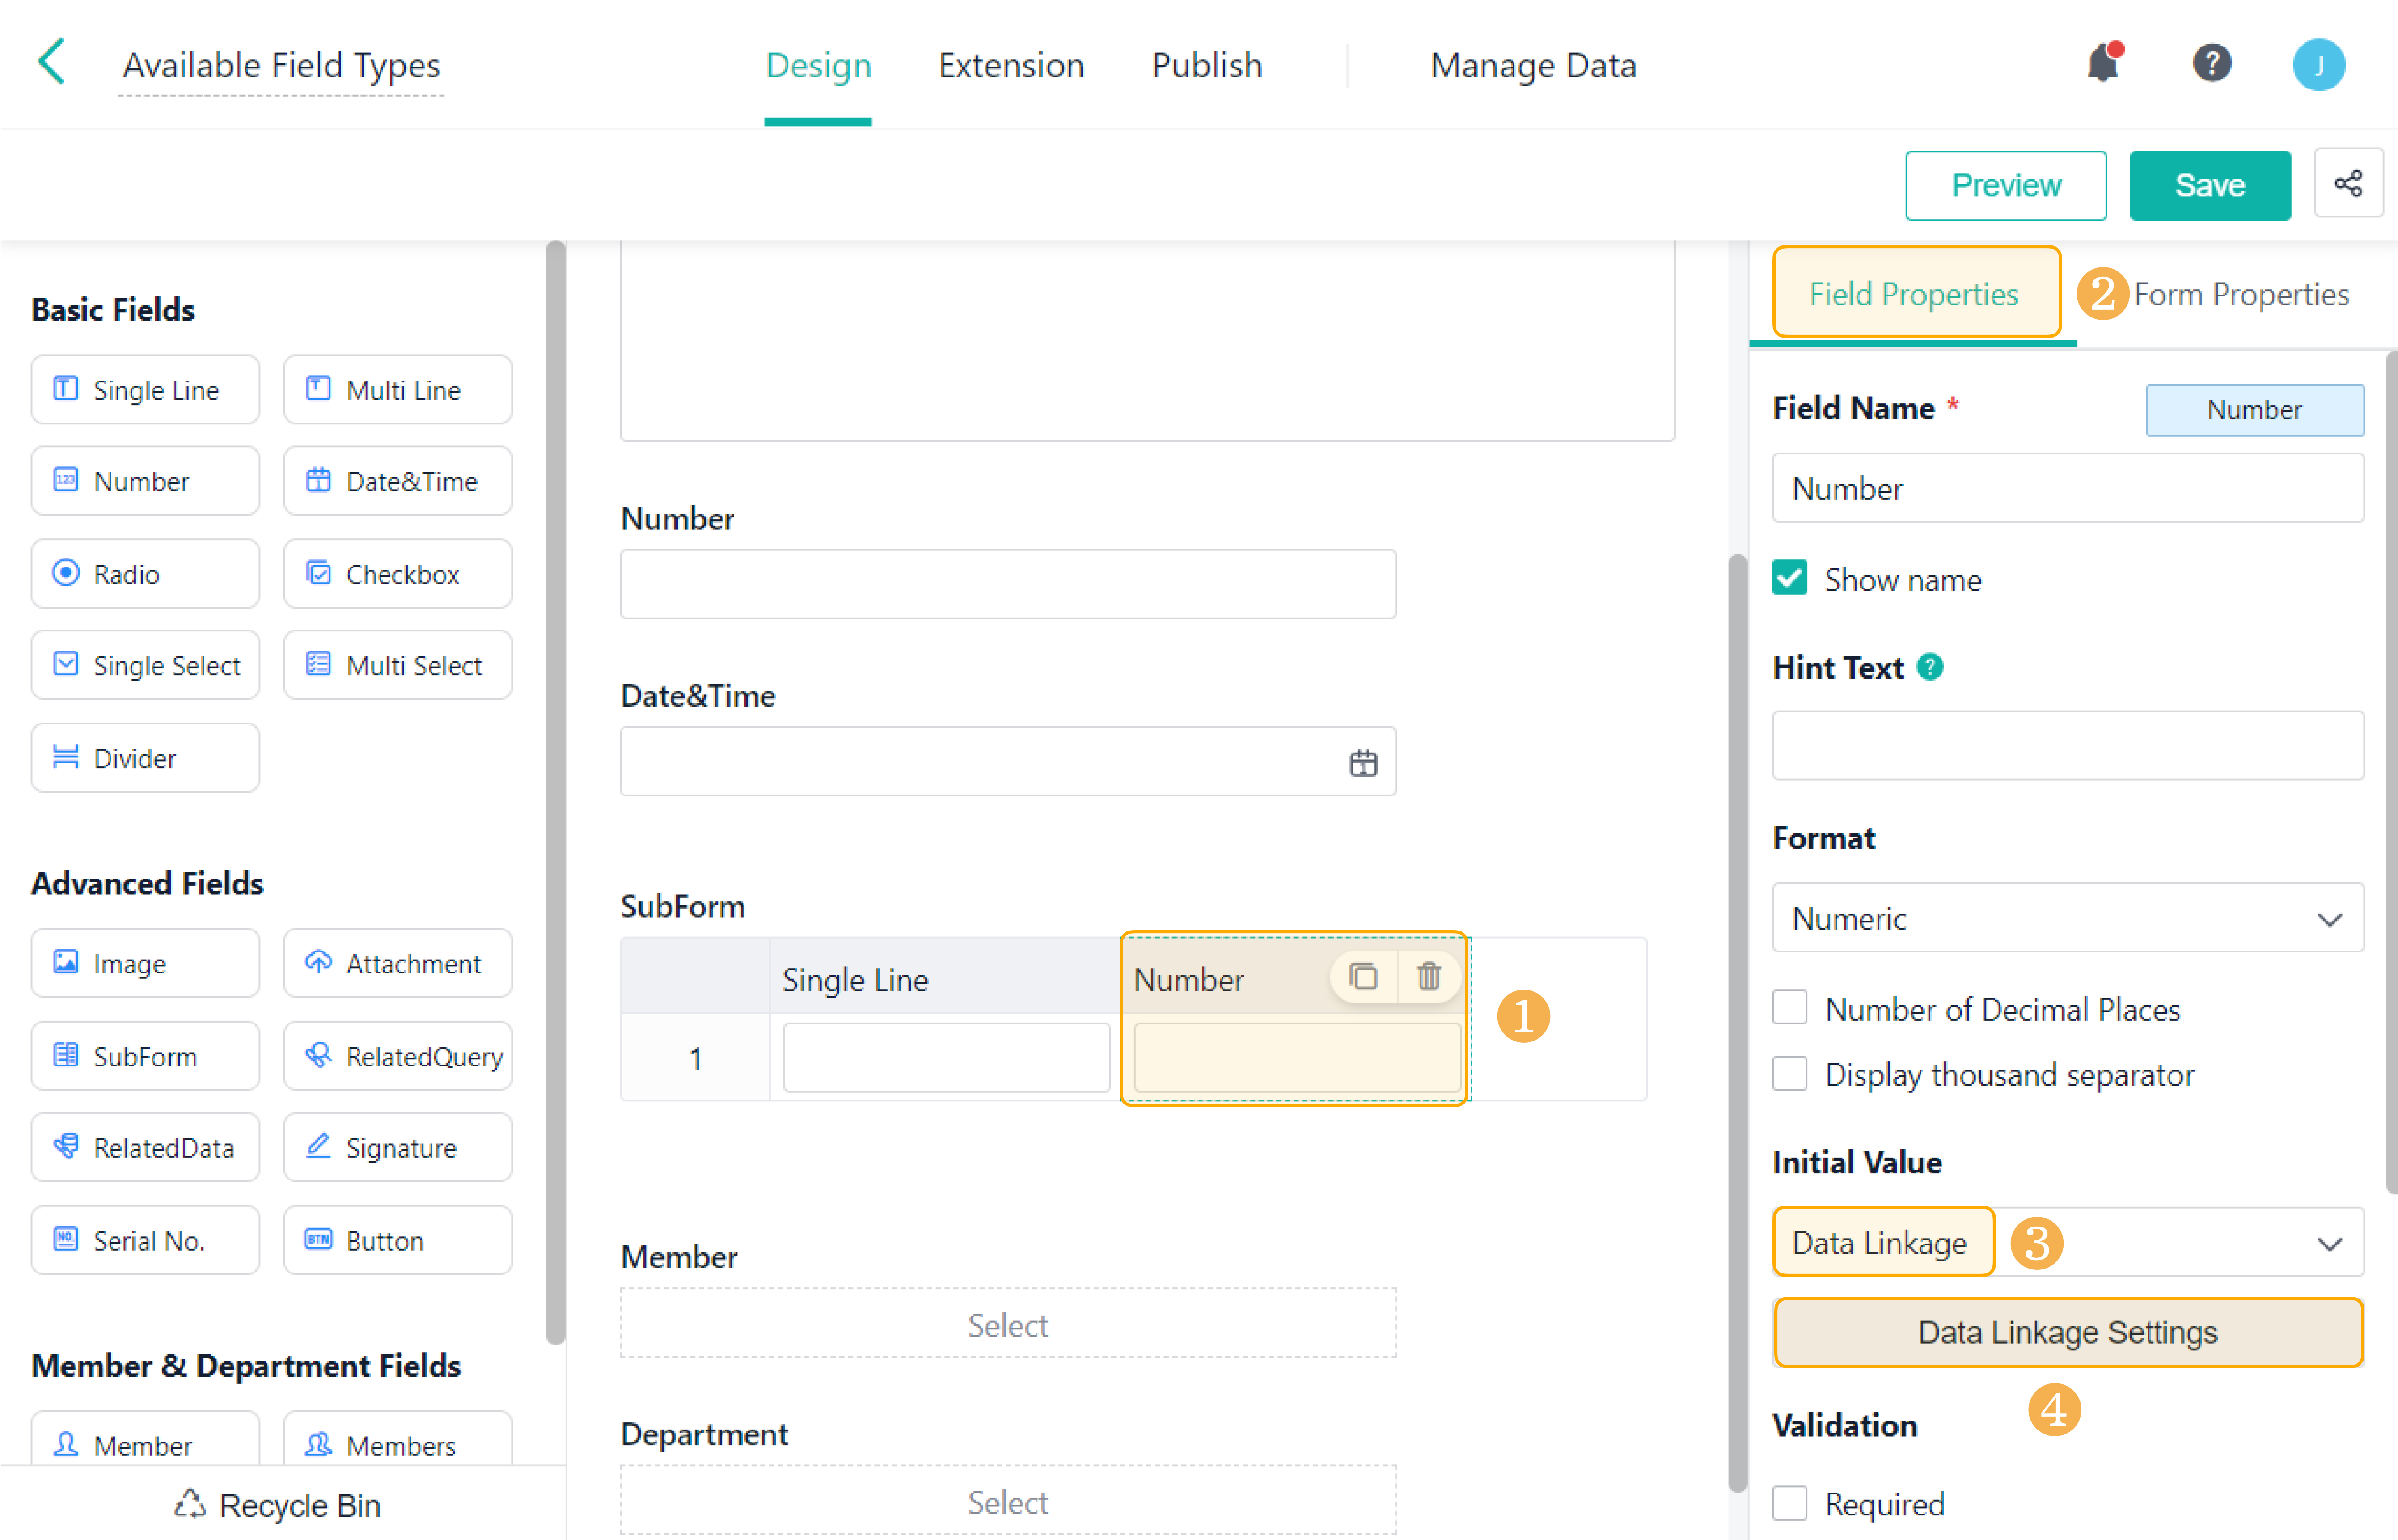
1. For the field types below, select the field and go to Field Properties > Initial Value to set Data Linkage: Single Line, Multi Line, Number, Date&Time, Image, Attachment, SubForm, Member, Members, Department, and Departments.

2. For the field types below, select the field and go to Field Properties > Option to set Data Linkage: Single Select and Multi Select.

3. For the field types below, you can also select the field and go to Field Properties > Available Options to set Data Linkage: Department and Departments.

How to Set
Click Data Linkage Settings to make settings.

On the Data Linkage Settings page, make the following settings:
1. Linked Form: select a form, an aggregate table, or an output form made by the data factory from the drop-down list. If necessary, you can also link a form from another app with the cross-app feature.

2. Triggering conditions: set the conditions that the linked form and the current form need to meet.
- Relationship between multiple conditions: When there are multiple data linkage conditions, you can choose to match all of or any of the conditions.
- all of: Only data that meets all the conditions will be retrieved through data linkage.
- any of: Data that meets any of the conditions will be retrieved through data linkage.
- Fields of the linked form: select existing fields from the linked form or submission fields (Created User, Created Time, Updated Time, or Workflow Status).
- Data relationship: select data relationships between the fields of the linked form and those of the current form based on the field type. The relationships can be set to equals, does not equal, equals any, does not equal any, contains, does not contain, is empty, is not empty, and so on.
- Field values of the current form: select Fields or Custom. If you select Fields, you can select fields from the current form. If you select Custom, you need to customize fields.

Note:
If you add records to a workflow form directly in Manage Data, the workflow status of these records is empty. Therefore, they cannot be retrieved when you set the filter condition as when Workflow Status equals Completed.
3. Triggered linkage: set the content to display with data linkage.
- The first field is the field you are editing. It is set by default.
- The second field is the field to call from the linked form. It automatically displays the field whose type and name are the same as the first field.

Click OK to apply the settings after finishing all settings.
Data Linkage for SubForm Field(s)
To set a data linkage for a SubForm field, select the field, go to Field Properties > Initial Value > Data Linkage, and click Data Linkage Settings to make settings. The settings are the same as "How to Set" above.
Data Relationship
Data relationships can also be set to contains, does not contain, is greater than, is less than, is greater than or equal to, is less than or equal to, and so on. The data relationships available to set vary according to the field type.

Custom Condition(s)
Apart from selecting a field when setting the data linkage condition, you can also enter a custom value to filter data that matches this custom condition. You can set a custom value when the field of the linked form belongs to the following types: Single Line, Multi Line, Number, Radio, Single Select, Serial No.
For example, when analyzing students' grades, you can retrieve the students whose total grades are greater or equal to 240.

Directly Jumping to the Linked Form
After selecting the linked form, will appear. If you need to view or modify the linked form when setting Data Linkage, click the button to jump to the Design page in the form.

Note(s)
1. The field type must be the same for the field from the linked form and the current form. For example, if you select a Number field from the current form, you can only link it to a Number field from the linked form. Special cases are as follows:
- Single Line, Multi Line, Radio, and Single Select can be linked to one another.
- Checkbox and Multi Select can be linked to one another.
2. If the retrieved value is unique, you can select any supported field type. If not, you need to use the Single Select field. Otherwise, only the first value will be displayed by default.
3. In practical cases, data linkage can be divided into single-condition linkage and multi-condition linkage.
4. For Single Select and Multi Select fields, you must enable Edit in Field Properties > Field Permissions to select a value from the result, or the result will be empty.

5. For Department and Departments fields, if you configure data linkage below Available Options, you need to select the value manually. If you configure data linkage below Initial Value, the value is displayed by default.

Troubleshooting a Failed Data Linkage
You can follow the below steps to troubleshoot a failed data linkage:
1. If you set multiple conditions, you need to check whether all of or any of the conditions should be met. If you have selected all of, only all the conditions you set are met, can the data linkage work.

2. Check whether the field types are consistent. For example, the field type of Name in User Registration is Member, yet that in User Information is Single Line.
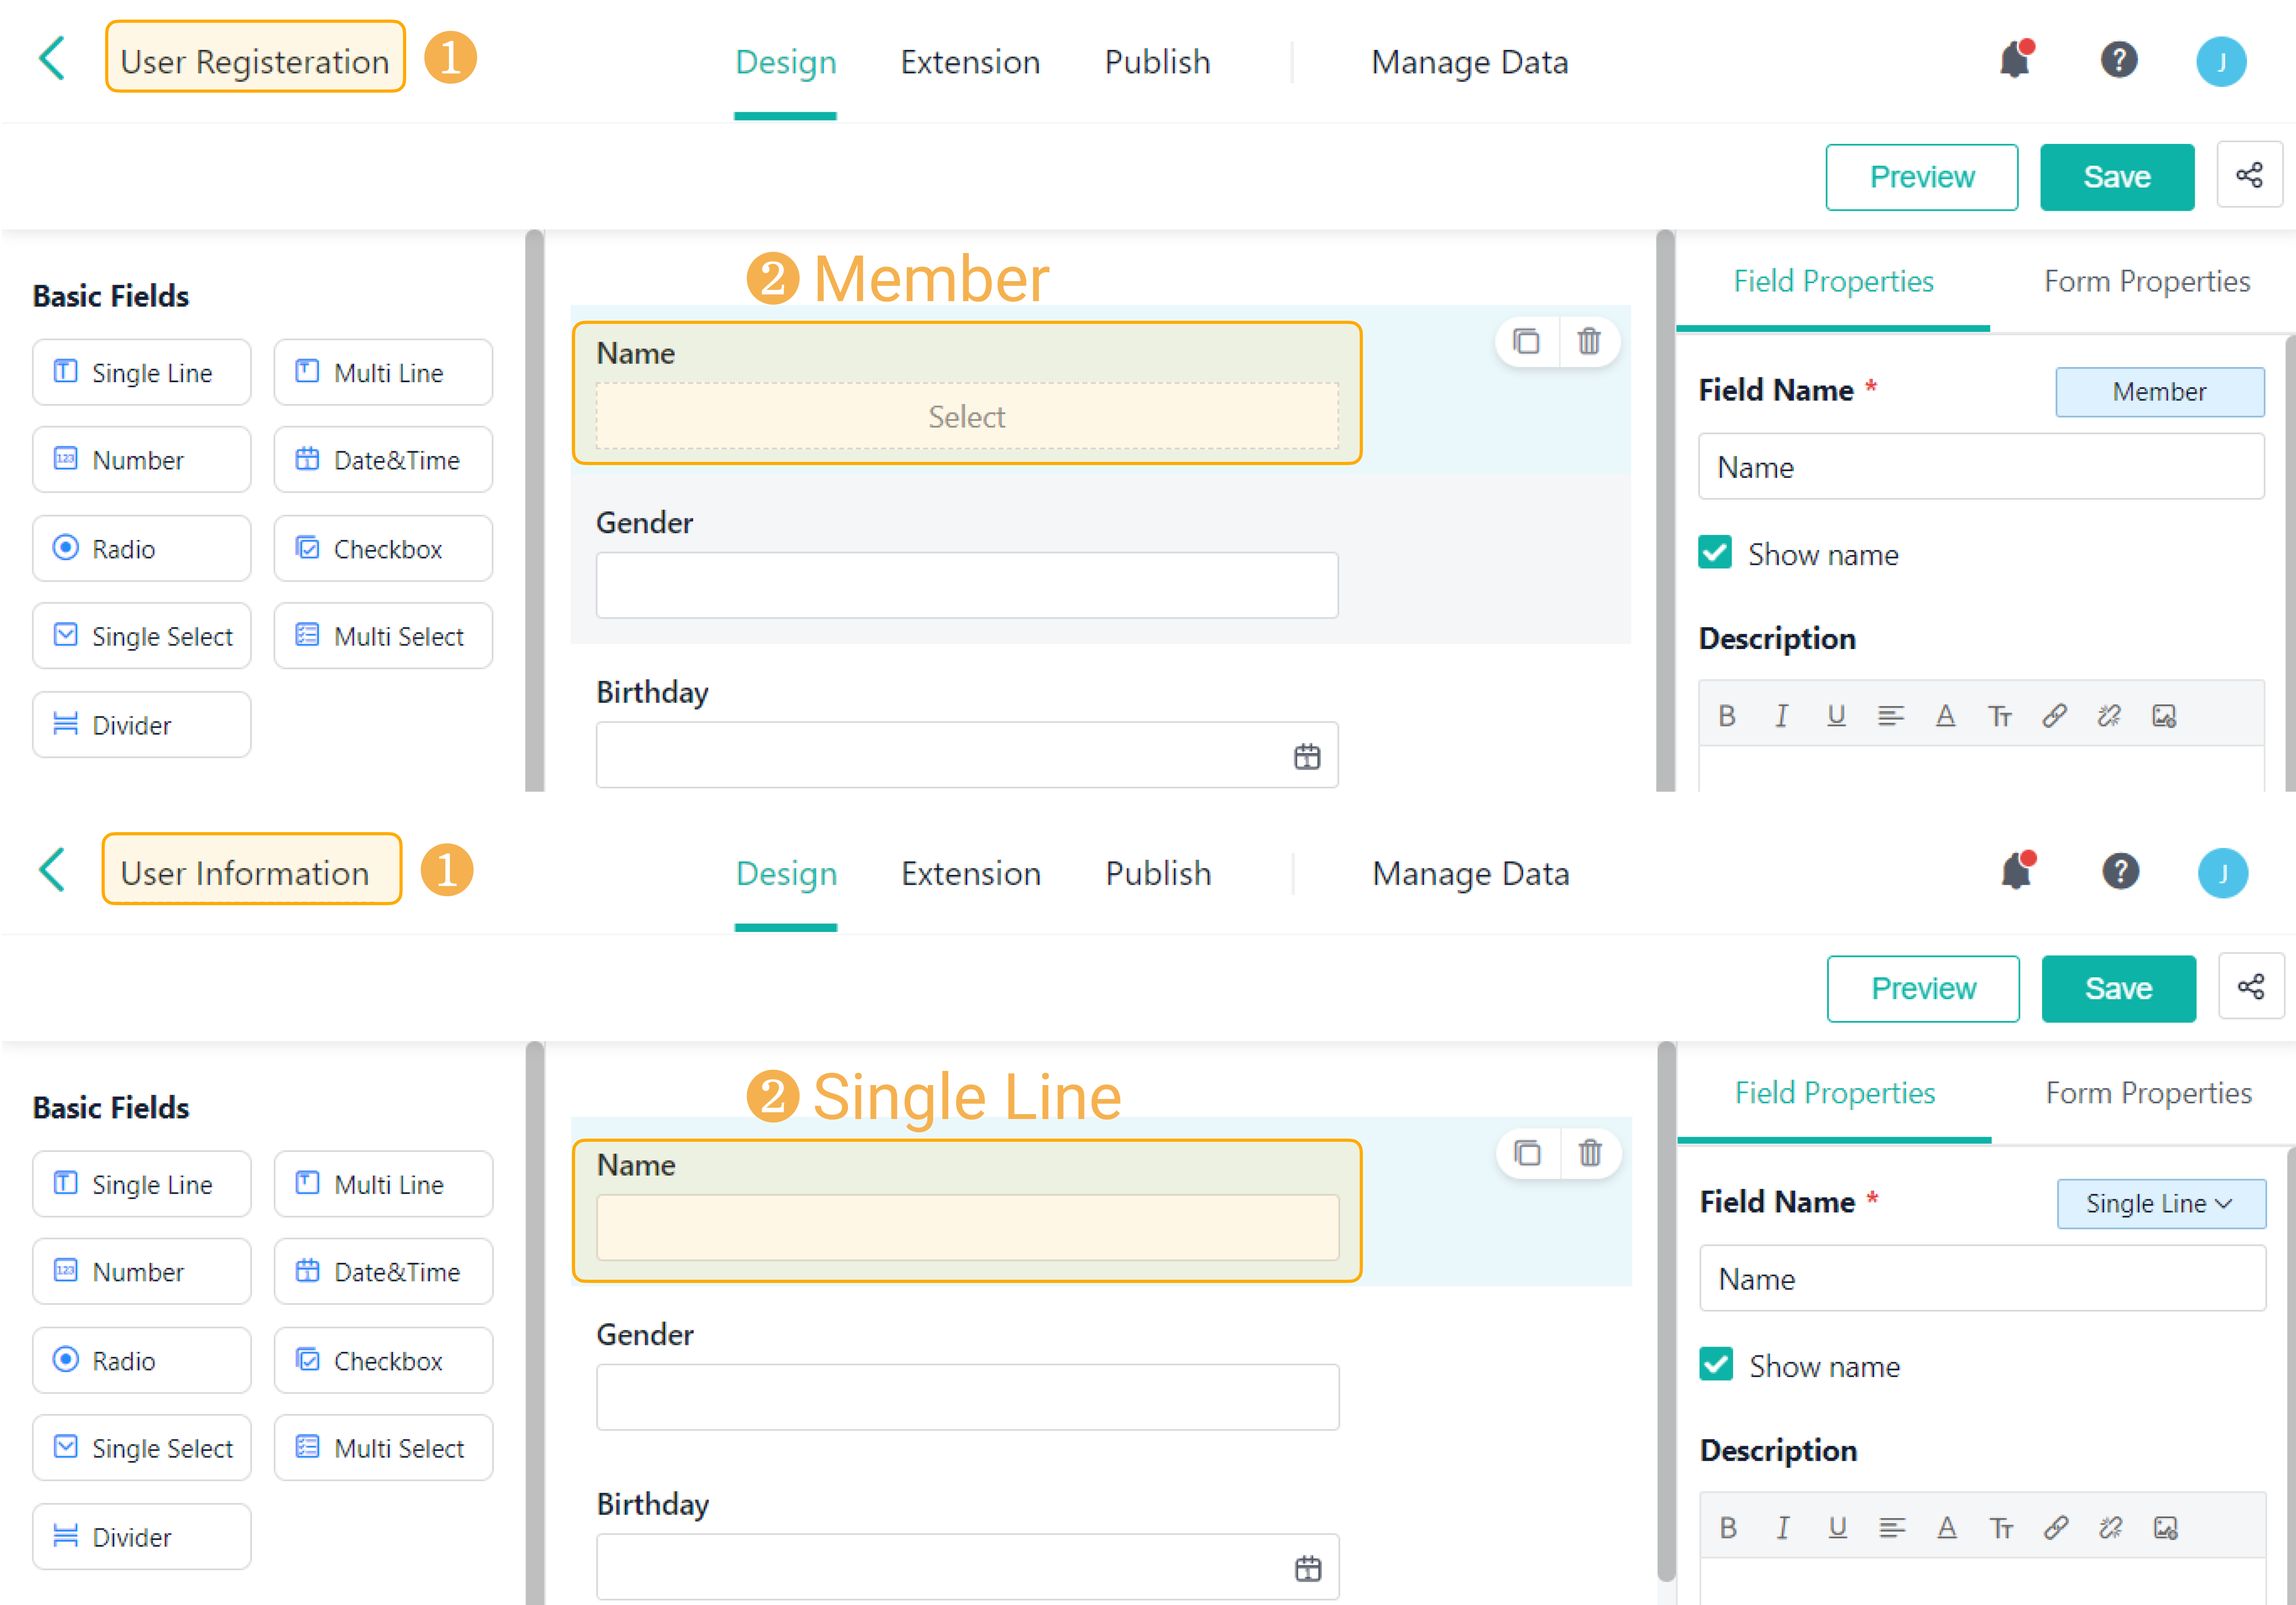
In this case, when setting data linkage for the Name field in User Information, you cannot select the Name field in User Registration. The field type must be the same for the field from the linked and current forms.

I have finished reading. 🏆
👉I can't wait to CREATE MY FIRST FORM.
👉I need more HELP in Discord Forum.